Chocolate Chip Walnut Biscotti

Most people have an aversion to certain foods. They don’t like bananas, or are allergic to garlic, or can’t stand cilantro. I don’t do nuts of any kind, and I don’t drink coffee. This biscotti recipe contains both nuts and coffee, a double whammy for me, so I cannot tell you that they are good. But you could believe me when I tell you that everyone who has tried them has loved them, and then give ‘em a go yourself.

I doubled the recipe* because I like to have enough to give some away. Okay, I give all these away. My friend Melba and her husband Brian had sad news recently about their beloved dog, and I hope these biscotti will help console their hurting hearts. If you know someone who could use a bit of cheer, consider a small gift of something homemade. We cannot change the circumstance, but we can remind people we love that they have been on our hearts. Food conveys love, care, warmth.

on plate.jpg

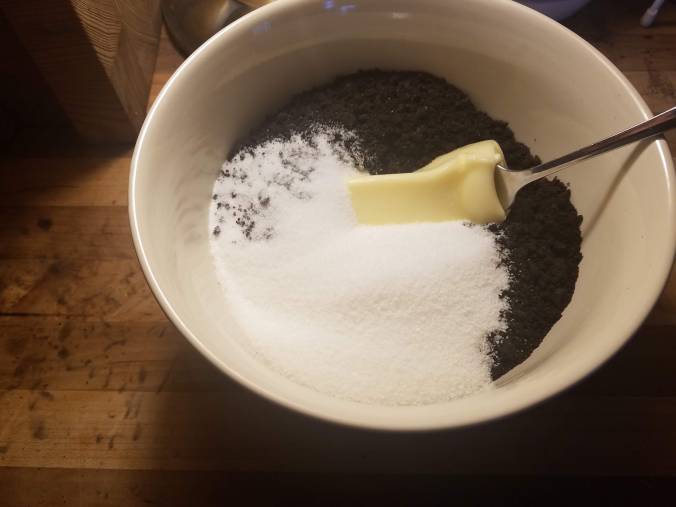
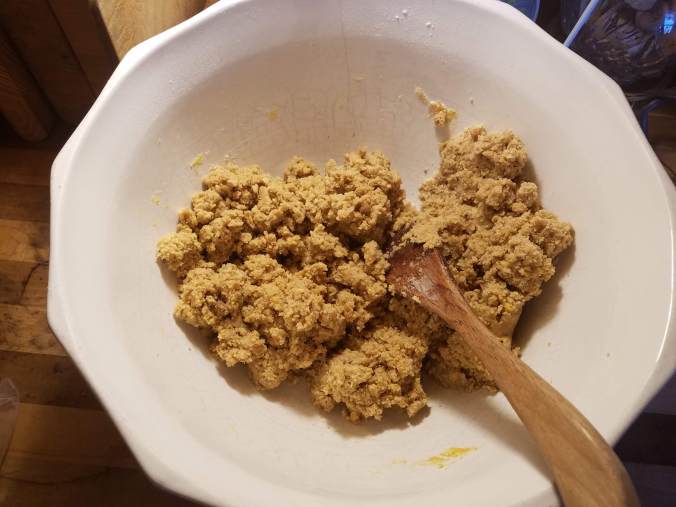
It’s an easy dough to put together, but I don’t know why they set up recipes the way they do. If they want you to cream the butter with the sugars and then add the flour and other dry ingredients, why don’t they tell you that? In that order? Why do they tell you first of all to combine the dry ingredients and then set them aside? Why would I want to wash two bowls when I can wash just one?

recipe cropped.jpg

I suggest: combine the butter and sugars, add the eggs, then the dry ingredients (I do not sift together these together, I just put them in), then the chips and nuts. This recipe says to use an electric mixer. You know I love my new mixer, and certainly you are welcome to use yours, but this is one you could manage with a good spoon. Your call.

The dough is like a cookie dough, pretty stiff, easily pulling away from the side of the bowl.

dough.jpg

I did not have instant espresso powder, whatever that is. But my former barista son Samuel tells me that ground coffee is the same thing, that the difference between coffee and espresso is in the brewing method and the brewing method only. Well, I hope so because he was sequestered while I was making these, solving yet another perplexing coding problem, and I had some ground Folger’s in the fridge, so I substituted that for the instant espresso powder.

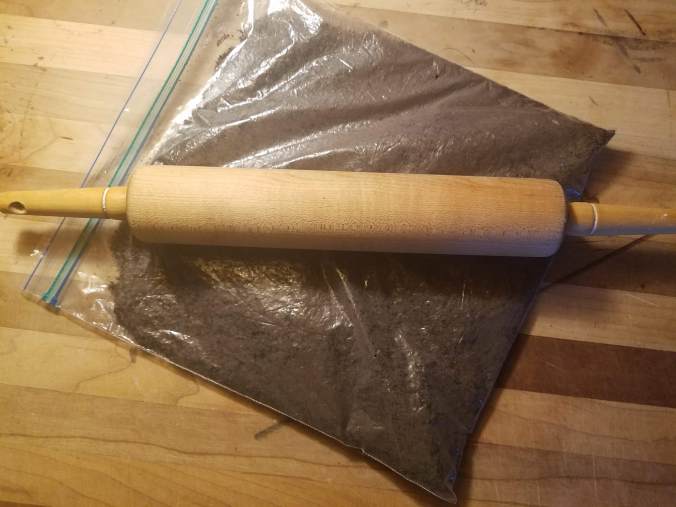
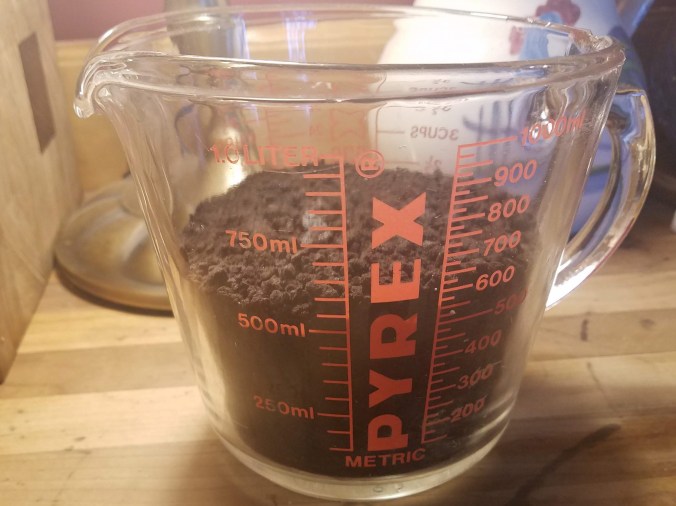
The walnuts are another thing. I had bought them already chopped but have learned from making this recipe in the past that if they are too big, the loaves are harder to slice when the time comes for that, so I chopped them smaller. For this purpose may I present the best chopper I know (Kwik-Kut Mfg. Co, Mohawk, NY). I’ve had it for decades but I know they still sell them. I got some for gifts at Yoder’s this past year. (Great for egg salad too, if you are into that.)

chopper.jpg

I put the 2 cups of nuts (remember I doubled the recipe) into my four-cup glass measure and chopped them right in there (again why measure in one cup and chop in another – that would be two things to wash instead of one). I didn’t get carried away and I didn’t go for a specific size piece. I just chopped till I got tired of chopping.

chopping nuts.jpg

I suggest using mini chocolate chips instead of the regular-size morsels (again for the ease-of-slicing reason), but I didn’t have enough (having used half the bag in the oatmeal cookies I made yesterday). So I used some regulars too, and tried chopping them into what I needed, the same as I chopped the nuts. It was a little harder but I reduced their size a bit. Using all mini chips would have been better. Get the minis.

all ingredients.jpg

Once all of the ingredients are combined, you can use your hands and form one solid ball of dough. I cut this into four pieces so that I’d have equal-size loaves.

divided dough.jpg

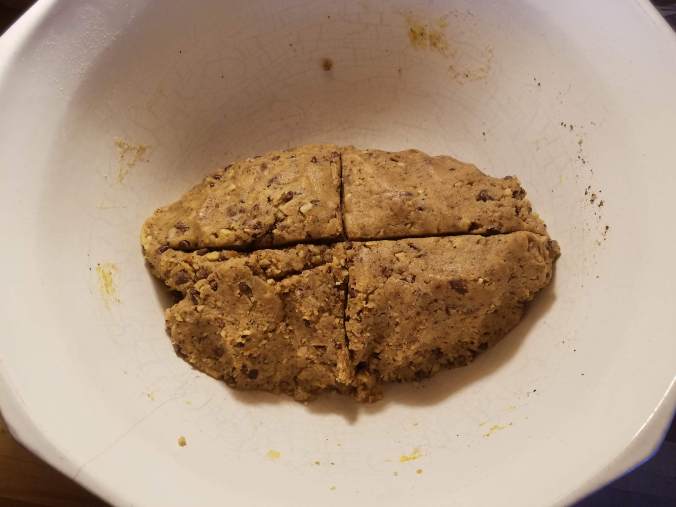
I formed these quarters and put them on my pans, hoping they wouldn’t spread too much. They look like little meatloaves to me!

unbaked loaves.jpg

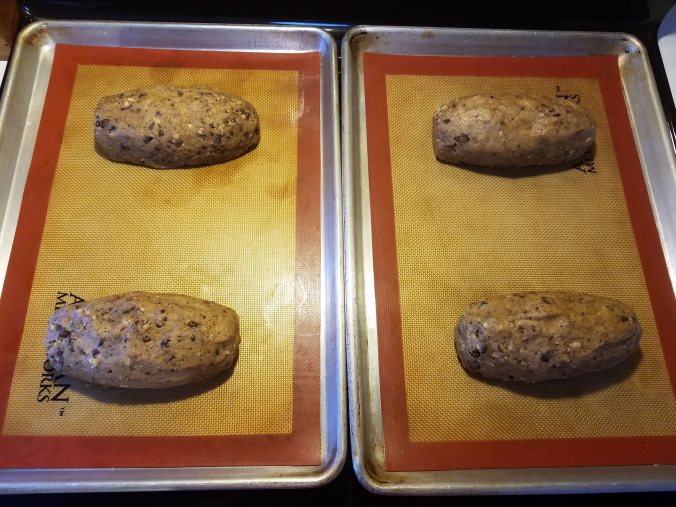
I found that it took longer to bake than the 25 minutes at (fully pre-heated) 325F for these loaves to be firm to the touch, more like 35 minutes. I gave them their prescribed five-minute rest period, then used the right knife for slicing biscotti to slice them. Between the nuts and the chips, and the loaves still being pretty hot after the five minutes, it was not as smooth going through as perhaps it might be (you see a few breaks), but I managed to slice them, put them cut side down and bake again. This too took longer, more like 15 minutes per side.

sliced2.jpg

Who knows, maybe I sliced them thicker, or maybe my oven is on the cooler side and I should have upped the heat. Whatever the case, they looked great in the end, even if I cannot tell you they tasted great. Samuel gave them the thumbs-up, and he doesn’t even like sweet things generally.

batch.jpg

Doubling the recipe made quite a few; I count about 30. These keep well, ship well, dunk in coffee well 😊 Enjoy!!


*recipe from my William-Sonoma Cookies and Biscotti cookbook, Time-Life Custom Publishing, 1993

A Pumpkin Custard Irregularity

Yesterday a can of pumpkin called my name. I know January isn’t when you usually think of pumpkin. Most canned pumpkin sold in the US sells in the fall, not in the winter, spring or summer.* Still, I saw it sitting there in my pantry when I was looking for the wheat flour and it called my name. Pumpkin is really good for you. It’s loaded with Vitamins A and C, and a cup of it has more potassium than a banana. Plus, I was hungry, and a great recipe for pumpkin custard popped into my head. It’s from my friend Bobbe (to whom I apologize if I have abominated her recipe).

Pumpkin custard is basically pumpkin pie without the crust. Maybe not quite as rich, and you have to be willing to eat custard without crust. Granted, a pie crust is the perfect, flakey, slightly crispy compliment to the smooth, velvety custard/pie. The combo is worth the trouble…usually. But not always. Sometimes I don’t want to make a crust, or I don’t have time. Sometimes I just want the creamy part – a quick and easy mixing of ingredients and into a baking dish it goes.

Yesterday I had another idea, a new idea. I opened the can of pumpkin, then found the molasses and poured a bit in. I didn’t remember that molasses isn’t in my pumpkin custard recipe – it’s in my pumpkin pie recipe – oh well! (This is what happens when you start putting stuff in the bowl before you open the cookbook.) Plus I didn’t actually measure the molasses, so never mind about it unless you want to put a tablespoon or two in there; it won’t affect anything except to make the flavor richer. I got the brown sugar out, and then the eggs and all the other ingredients – all while contemplating a strange addition. It was breakfast-time, okay, so I can be forgiven for this I think. How about some oatmeal?

Oatmeal?? Oatmeal!! I took down my beauteous old tin (isn’t it beauteous?)

quaker oats tin cropped.jpg

and (definitely did not measure this) added two handfuls of the old-fashioned oats contained within – what I could hold in one hand twice. I stirred it all up and poured it into the 8×8” cast iron pan I had had heating up in a 375F oven with a pat of butter in it (the recipe says 350, but 375 worked just fine). I cooked it till it was set, wondering all the while if I was crazy. It’ll just be pumpkin custard with a bit of texture to it, I told myself. It takes a while for this to bake, and I was doubting myself considerably the whole time, I won’t lie. But it wasn’t half bad! Actually I was quite pleased with not-overly-sweet pumpkin flavor and the nice oatmealy texture!

pumpkin custard.jpg

This photo doesn’t come close to doing it justice, but really, if you want a twist on pumpkin custard that works for breakfast, this is worth a go! You could eat it hot, warm or cold, but I think warm is best. I was pretty excited about it, and mentioned it to Samuel when he came out from his coding-cave. He said, “You did what?!” I told him again and he said, “Mom, that’s like putting peas in bread! It just doesn’t go together!”

I said, “Frozen peas or canned peas?”

“It doesn’t matter,” he said. “Either way, both are food combinations that don’t make sense.”

I am not ready to put peas in my bread dough and see what happens any time soon. But oats in pumpkin custard isn’t that weird, is it? Let’s just call it irregular. A long time ago I read a book called Irregular People* which was about exactly what you think it would be about (and can’t we all think of someone who fits that word?!). Irregular is a very cool word anyway, even if it does, for me, conjure up images of strange and/or difficult people. I’ve decided that it applies nicely to my custard-oatmeal combination, if I may say so.

In case you are inclined to think out of the custard box and the oatmeal box, so to speak, and in case you have a can of pumpkin in your pantry that you should use before next fall, you might want to give this a whirl. Here’s the recipe from my cookbook, typed out below in case the handwriting is hard to read. With or without some oats thrown in for a little texture, enjoy!

recipe cropped.jpg

Pumpkin Custard

Preheat oven to 350F.
Combine:
1 ½ cups cooked, strained pumpkin (one 15oz/425g can)
2/3 cup brown sugar (I did not add this much, but did add some molasses)
3 beaten eggs (I did not beat mine before adding them in)
1 ½ cups scalded milk (I added it cold and it worked fine)
1 Tablespoon cornstarch (I forgot this)
1 teaspoon cinnamon (yes)
½ teaspoon ginger (yes)
¼ teaspoon each ground cloves and nutmeg (I did not add these)
(I added two handfuls old-fashioned oats)

Pour in buttered baking dish (don’t you love how the recipe assumes you know what size dish to use? I used my 8×8” cast iron)
Bake 45 minutes or till set.


*According to the Agricultural Marketing Resource Center, Libby’s (owned by Nestle), with 90% of the US market for canned pumpkin, sells 90% of it from October through January.

** Irregular People by Joyce Landorf Heatherley, 1982

A Bit Brisk

On Friday of last week we arrived at Lincoln and Julia’s straw bale house in Vermont at about 430 in the afternoon. Temperatures were in the single digits, maybe below zero already – at that point, what does it matter? – and lots of snow blanketed the ground. Six-year-old Rise came out to greet me wearing her pajamas, leggings, socks, slippers and a sweater. “It’s a bit brisk,” she said plainly.

a bit brisk.jpg

This photo was taken before the 18” or so of fresh snow that fell the next day. Do you see those icicles hanging on the side of the house? They looked like this straight on.

icicles.jpg

Yes, that’s plastic on the windows. That’s as far as they have gotten so far. It’s a double layer of 6ml plastic, which is a fairly decent wind block. In case you were wondering, straw bales have great insulatory value, but are much more effective when they have been mudded and sealed, which will happen in warmer weather. As of Friday night there was also no upper floor insulation except for the air trap – the 1/2” green foam insulation sheeting over 2” foam blocks separating the green from the inside surface of the plywood of the roof. On Saturday morning, following Lincoln’s birthday party Friday night, he and Julia posed for me on that upper floor.

Lincoln and Julia.jpg

You see lots of green but no pink puffy insulation. That’s because they had barely begun that part. Over the course of three days, the upper floor went from this …

10.jpg

…to this. The walls (not the ceiling yet, but they’re getting there!) are fully pinked!

12.jpg

You can imagine that the pink makes quite a difference regarding heat loss and therefore overall warmth.

11.jpg

I will come back to the specifics of the construction. For now I just want to make it clear that without insulation it wasn’t overly warm in there. At one point I found Eppie standing between the couch and the chair next to it eating ice. Where did she get the ice she is very happily eating?

Eppie ice.jpg

Right behind her, where post meets straw bale meets interior 6ml plastic, there’s a bit of ice. But only here and there.

ice inside.jpg

While the exterior temperatures varied between -11 and 8 (-23 to -13C), the interior temperature maintained a steady mid- to upper-50s (12-14C), which is a tremendous improvement over the 25-30 degree F differential they experienced at first. By Monday evening when all the insulation was in the upper walls, the house was holding at 58F with a good fire going in the wood stove even though there was a fierce wind making the below-zero temps feel much colder outside. Here we are playing Ocean Bingo…

game2.jpeg

…and sneaking Samuel’s homemade crackers.

sneaking crackers cropped.jpg

You can see that neither Rise (who walked outside in her pajamas) nor Eppie (ice-eater) seems to need the hat and multiple layers of wool that I do not feel quite comfortable enough to take off, though toward the end, as the pink upstairs increased, I unzipped the vest a few times. Half the time, the girls forget to wear their slippers and are running around the house barefoot or in just socks.

Oh, the poor socks. Here is what happens when socks meet sawdust. Ah, well, they function just the same!

socks.jpg

During the weekend snowstorm, while the wind blew and the temps outside maxed out at 4F (-15C) — not counting wind chill — we were continually shoveling a path.

snowstorm.jpg

This family continues to amaze me. They take it all in stride and don’t see how extraordinary it all is. They just live there, dressing appropriately, taking one day at a time, gradatim ferociter: step by step with ferocity. It will all get done. They will put the rest of the insulation in; hang, tape and paint the sheetrock; mud and paint the straw bale walls inside and out; install a wood floor on top of the subfloor and (yes!) enjoy hot and cold running water – all in good time. Even when it’s a bit brisk!

gradatim ferociter.jpg

Lyn’s Comfort Quilt

Hopefully every one of us bears witness to – or is blessed to be part of – a truly wonderful marriage. I’m talking about the kind of marriage in which both people know beyond any doubt that they are each other’s best friend, that only together are they the best individuals they could be, that because of being together their lives are full, rich and meaningful to the limit of what humans can experience and that words like commitment, trust, companionship, care and joy are not just words, but are lived out in tangible, consistent ways.

Lyn and Bertie had one such marriage. I got to know them in my early 20s and was blessed to watch in awe for decades as they walked their godly ways, kindly opening their home to me and many others, being the best of neighbors and friends, modeling grace, humor, generosity and gentleness. Ten years ago we stood in their living room capturing a single moment in their wonderful world.

with Lyn and Bertie (2).JPG

We never want sad things to happen, especially to people we love, but we know we are not immune, that we will not escape crying buckets when the realities of life and death impose upon us their at-times-devastating ways. There are no words for the heartache that comes, as it did for Lyn a year ago, when one of a perfect pair is left behind.

I had tried for years to tell Lyn how much she meant to me, how her everyday walk inspired my own, how her selfless service to those in her path shone brightly and brought good beyond measure. I wrote notes and letters mostly, but words are just words, as they say, and you can’t hold them in your hands and they don’t dry tears.

My dear friend Kim, Lyn and Bertie’s only daughter, had an idea that turned into an opportunity for me to show my love, gratitude and admiration. Shortly after her father passed away, Kim told me she wanted to use his shirts to make pillows (or something similar) to remind her own sons and their cousins of their grandfather. As we talked, the idea quickly evolved into using those same shirts to make a quilt for her mom – a way to help her feel close to him, to be wrapped up in him, to have a part of him near. Kim said the only problem was that she herself would have a hard time cutting her father’s shirts.

That’s where I came in. One thing led to the next and Kim sent me the shirts – mostly conservative, neutral buttondown oxfords that were either solid color or had teeny, muted plaids, but also one dark green solid, a work shirt as Kim called it. All of them had (as men’s shirts generally do) a chest pocket. Bertie always kept a hard candy in his chest pocket to be able to offer one to others, but also, as Kim says, “as handy access for himself because he loved sweets!” He also liked to wear bold-striped rugby shirts, but using knit fabrics along with woven fabrics would be tricky, plus the stripes are proportionally bigger than would work well.

Kim agreed to leave the project in my hands. I did what I always do when a quilt is happening – I opened my own fabric scrap boxes and began to see what might work alongside the shirt fabrics. By themselves, the oxfords and the one dark green would have a hard time being interesting, even if they were the core of the piece. I found some perfect blue and white bold-striped material, a miniature version of rugby stripes that would serve as the rugby element and got Kim’s permission to add color and some femininity – it would, after all, be a lady’s (a dear lady’s) quilt and lay on her bed in a room papered with tiny rosebuds.

I had some other good coordinating fabric scraps, but not enough, nor enough variety of color. Coincidentally, my friend Anett was coming from Germany to visit for five days in April. If anyone has an eye for color and design, it’s Anett. We went to the store and found the following to add to the shirts and what I already had.

fabrics cropped.jpg

Making a quilt is more fun together. This was already a group project with Kim’s idea, Anett’s eye and Lyn’s consent. It was even better that Anett was willing to iron, cut and organize squares with me. We even got a few of the nine-squares sewn together while she was here. My dining room table was the perfect work surface.

fabrics on table.jpg

Anett and I cut large squares of the shirt fabric and alternated these with nine-squares that themselves were put together with a variety of fabrics. After Anett left, I kept going, hugely motivated by the hope that somehow this quilt would bring comfort to Lyn. I knew I was taking a chance with the additional fabrics. I hoped, for example, that the polka dots (tiny as they were) wouldn’t strike her as frivolous or too playful at a time when her heart hurt so much.

early construction (2).jpg

I played around with the arrangement a good bit, getting closer to what seemed best every time I moved them around on my bed, and finally got them connected with the strips of gray that form the mullions of the panes. I chose a lighter gray for the back, a soft flannel sheet in fact that looked silvery to me, like the silver lining of a cloud. I chose one of the shirt pockets and appliqued it on the back of the quilt in the upper left, about where (proportionately) a shirt pocket sits on a shirt.

The dark green worked as a defining border around the edge. Kim said later, “One thing that struck us about the quilt is that you used my dad’s work shirt cut into those small strips as the edging to frame it and hold it all together. Far beyond the dark green edging looking nice, it was symbolic of my dad’s hard work, strength and care for his family.”

I quilted the three layers together and carved Bertie + Lyn on a tree, so to speak, on one of the shirt squares. If any part of this project brought tears to my eyes (and still does), it’s this.

IMG-20180510-WA0001.jpg

Some of you may recall that in the early spring there was a huge building project at my house – a new chicken coop. I had helped dismantle the old run, dig post holes for the new run, set the cedar posts in cement and erect the foundational elements of the new coop. Then right at the end of April, I got sick. I got a coughing sickness that kept me pretty much planted on the couch for almost a month. By the time this happened, the main part of the quilt was together and mostly handwork remained. Had I not been sick and confined to indoor, quiet work, I am not sure how this quilt would have been finished by the time Kim and I planned to rendezvous at Yoder’s in Madison, Virginia, for the hand-off in May. But it was.

Before I packed it up, I put a hard candy in the pocket.

Kim had asked me to send a photo of the quilt while it was in process. I had this photo of it finished…

IMG-20180510-WA0000.jpg

… but I told her a photo would spoil it, would not give the best idea of it (I still think this) so I didn’t send it. She waited. I was very happy that when she finally held it in her hands, she was sure her mom would like it.

with Kim at Yoders (1).jpg

Along with the quilt I sent a note to Lyn. It included: No doubt you will recognize Bertie’s shirts. But all by themselves they would have made a very dull quilt indeed and not come close to reflecting his unique personality. Plus, we all know that only together with you was he the man he was. You were there every step of the way and he needed you as you needed him. So the quilt had to reflect you too. You are so beautiful!

Oh the fun I had! There had to be some bold stripes for his rugby shirts, a pocket for his candy, some rosebuds and other flowers and some pink for you, some softness, some delicacy, splashes of color, old and new, subtle and fun, conventional and unexpected, greens for the Green Mountains of Vermont, blues for the glorious, endless sky, golds for the golden years you had together, your names carved together somehow (I hope you like the how!).  Hopefully the fabrics, each in different ways, bring you good, peaceful, comforting thoughts, and the combination of them pleases your eye and your heart. Hopefully it looks nice in your room and adds warmth in ways that only God can make happen. Hopefully Bertie feels a little bit closer.

Lyn sent me a beautiful, heartfelt letter of thanks that overjoyed me. Kim said, “The quilt is a treasure. Mom snuggles down beneath it as she rests. I often go in and rub my hands over it when I am at the house. It feeds the longing I have to be near my dad. I think the quilt, made with love and with all its symbolism, is the most beautiful gift you could have given my mom to bring comfort to her broken heart.”

When I went to Vermont in August, I got a big hug from Lyn and was able to see it on her bed. How blessed am I to have such marvelous people in my life, and how grateful to have had the opportunity to give back some small measure of good to Lyn, who has done more for me and for everyone around her than she will ever know.

Lyn B1.jpg

Chocolate Cheesecake and Degrees of Fabulousness

The tradition in our family is that on your birthday you get the kind of cake you want. It’s telling that the last two cakes I’ve made my children – for Marie in Boise in September and for Lincoln this week (to bring to Vermont) – have been chocolate cheesecake. This is one of those that I’ve made quite often over the years. It always cracks, but that never matters! It’s totally fabulous. There are no words to describe its fabulousness.

You start with a box of Nabisco chocolate wafers crushed up fine. These are dark, thin and crisp. They crush into fine crumbs nicely. I used to use my food processor, which works great and creates fine, even crumbs, but then I was in a hurry one time and didn’t want to bother taking the machine out, setting it up, using it for one minute and then having to clean, dry and put it all away again. So I tried using a gallon-size ziplock bag and a rolling pin, which requires more uumph but does the trick, and have been doing that ever since. Plus I always figure that if I work a little harder to make the cake, if I exert more energy, burn more calories, I have less to worry about when the time comes for eating it. This may be faulty logic, but it has served me well 😊

crumbs.jpg

One package of cookies is 9 oz (255g) which crush to about 2 cups (500ml), a little more maybe depending on the size of your crumbs.

crumbs in cup (2).jpg

The cookie crumbs get mixed with ½ cup sugar and 5-6 tablespoons of butter. It’s better if the butter is soft to begin with, but if it’s not, you can manage. I am not being exact on the amount of butter because it doesn’t matter. It works just fine with 5 TB, but 6 makes the mixture a bit more pressable in the pan. A fork works to mix it up, but if you have a pastry blender, that’s a bit better.

crumbs in bowl unmixed.jpg

Mixing it up means evenly distributing the sugar and the butter. It ends up looking like this.

crumbs in bowl mixed.jpg

I’ve made this recipe many times and found it makes a very thick cake, so I took to making two, one small and one large. (Now that I think of it, that’s probably why I started using the whole package of cookies — see recipe below.)  I don’t think Lincoln will object to having two birthday cakes! I used two springform pans, one 26cm (10.5”) and one 17cm (6.5”). You could use any combo that adds up to about the same size, or one very large pan and have a thicker cake.

Into the pans go the crumbs. You press them out with your fingers or the back of a spoon until they are not too loose. You’ll be plopping thick cake batter on top of this.

crumbs in pan.jpg

Oh, the recipe. I copied this years ago out of a book called Great American Cakes, which I cannot find. Looking at the recipe. seems I did make some changes! I use the whole package of chocolate wafers and correspondingly a bit more butter, but I stayed with the ½ cup sugar. The batter part, I promise you, I always make exactly as the recipe says (well, almost, we’ll get to that). Trust me, it’s all good!

recipe (2).jpg

(In case this is hard to read, I’ve typed it out below.)

I did two things differently: 1. After I beat the eggs into the cream cheese mixture (or watched as my beast of an electric stand mixer beat it in), after I added the vanilla, sour cream and chocolate and watched said mixer combine all these ingredients, I turned up the speed. I’m blaming this on Aquaman! Yes! On account of it having been an awesome movie, Samuel and I subsequently watched Captain America and The Avengers, all very (goes without saying) action-packed and fast-moving. Could there be something changing in my brain – hey, speed can be fun! – that I am transferring to cake-making?? It made a beautiful fluffy batter, I can tell you that. (You may note my restraint – I am not going to go on and on about the swirls!)

batter.jpg

So I did not allow the mixer to simply “stir in” the vanilla, sour cream and chocolate. I let the machine beat it silly! This produces air in the batter, which may or may not be a thing I decide is a good, permanent change. This is how recipes evolve.

A thing to know is that this cake cracks. I always have followed the recipe exactly regarding the very slow cooling process, which is to help prevent cracking, but it always cracks anyway. When I say crack, I mean crack. It goes from being smoothed out in the pan (pans in this case)…

batter in pans.jpg

…to looking like the Grand Canyon on steroids.

cracks.jpg

But it doesn’t matter! You take a can of cherry pie filling, spread it on top and watch all signs of cracks disappear! No one is the wiser and it tastes heavenly! Just don’t forget the cherry pie filling (although you could use any flavor of pie filling that you deem appropriate to go with chocolate cheesecake).

About which I must tell you my second change. This cake is for Lincoln, who in the past always left the cherries on his plate. He liked the sweet, pudding-like, thickened cherry juice just fine, but the cherries themselves he couldn’t eat. Last time I made this for him, I tried using (what was then new and I was playing around) my immersion blender to finely chop up the cherries and blend them with the pudding-like part. He loved it! So that’s what I do now.

with cherries.jpg

That’s the thing with recipes, with life! You can do something this way or that way for years (I’ve been making this recipe for at least 20, I’d say) and one day get a brainstorm that turns out to be a much better way. I am unable to firmly say yes-absolutely-go-for-it! regarding the late-stage furious whipping of the batter because with the whipping it’s fabulous and without the whipping it’s fabulous, and who can measure degrees of fabulous-ness?? But on the changing of normal cherry pie filling (with whole cherries in it) to a thick, fruity topping of even consistency – that’s a keeper!

Chocolate Cheesecake with Cherry Topping

2/3 package chocolate wafer cookies, crushed
½ stick (1/4 cup) butter
½ cup sugar
———————————————————
2 Tbsp unsweetened cocoa
1 Tbsp flour
½ tsp salt
½ cup sugar
½ cup light brown sugar
1 ½ lbs (3 eight-ounce packages) cream cheese, softened
5 eggs
2 tsp vanilla
1 cup sour cream
8 oz. (2/3 of 12-oz package) semisweet chocolate morsels, melted (4 mins on power 4 in microwave)
1 can cherry pie filling (for topping)

  1. Combine crushed cookies, ½ cup sugar and butter for crust. Press into bottom and sides of springform pan. (I cover just the bottom.)
  2. In large bowl (I use my large stand mixer bowl) beat cream cheese with electric mixer. Add cocoa powder, sugars, salt and flour; beat till smooth. Add eggs, one at a time, beating after each. Stir in vanilla, sour cream and melted chocolate. Pour (plop carefully) into crust.
  3. Bake in preheated 450-degree oven for 15 minutes. Reduce oven temperature to 300 degrees and continue baking. Turn off heat but leave cheesecake in oven for one more hour. After that, still leaving cake in oven, prop oven door open (very slow cooling), another hour. (Remove from oven, transfer to plates by sliding a knife around the edge of the springform pan, opening the release of that pan and carefully removing side part, sliding a wide, strong spatula carefully under cake and easing it onto a plate.)
  4. Spread cherry pie filling on top (put in blender or use immersion blender first if you want to chop up the cherries.) Cool rest of the way in fridge.

Straw Bale House: Part 3 (Yurt)

A Shower or a Fridge: Which Would You Choose?

Lincoln and Julia’s one-of-a-kind, pentagonal, straw bale house was first of all a dream. It did not come in a kit. There were no pre-existing plans. This photo, taken with immense joy in late 2018, shows the first time smoke came from their stovepipe. Walls, roof, heat — these must come first.

28smoke in chimney

Houses like this, especially when you are building them almost single-handedly, do not come together quickly. It took nearly two years on the property for Lincoln and Julia to be able to abide in this abode, even if it is far from finished. Until then, they all had to rest their heads somewhere. The choice seemed perfectly logical: a temporary dwelling just down the hill.

In the late winter of 2017 they bought the land. The first two weeks (thankfully now just a memory) they slept in … a tent. That year at that time was not as snowy (snow might have been less brutal) as it was rainy — a nonstop, 40-degree drizzle that erased the snow but gave them nowhere to warm up. In their memories this qualifies as the worst part of the adventure. But spring came and with it, the beginnings of permanency. You can cook outdoors on a camp stove for a while, but an indoor kitchen, however rudimentary, has advantages.

early camping2.jpg

The yurt that would be their home for nearly the next two years had been erected twice before – the first time on a hillside overlooking Mt. Mansfield immediately following their wedding in October 2011. (Yes, they lived in it all that winter! A small wood stove inside heats up the entire space to a toasty 65 degrees or so, and 65 feels toasty indeed when it’s 4 outside.) The second time was for a short while in Virginia before Rise was born.

This time they sunk pressure-treated 4x4s down to bedrock and built a non-equilateral hexagonal framework of double-beamed 2x10s. That’s three long double beams laid parallel to each other — one 17-footer (about 5.2m) across the middle, one on each side of it about 8 feet away and four more that closed in the frame, like my imperfect sketch (you get the idea).

yurt framework cropped.jpg

The 2×6 joists that stood on end across the framework then each had at least two points to rest on.

yurt base.jpg

So far this was more like a freestanding deck than the base for a dwelling. But let’s be real — this is Vermont and it gets mighty cold. So they got underneath, stapled landscape fabric to the undersides of the joists and filled all the in-between spaces with regular loose-fill cellulose insulation that was repurposed from the walls of their good friend Zach’s house. The insulation provided a critical measure of warmth and the landscape fabric gave incidental water a way out.

yurt base with sand.jpg

After the insulation between the joists came the pine plank flooring. Remember this is the third go-round in a yurt. They chose pine planks “after not enjoying being on osb or dirt.” (OSB, oriented strand board, is, according to Wikipedia, “a type of engineered wood similar to particle board, formed by adding adhesives and then compressing layers of wood strands (flakes) in specific orientations.”) Lincoln says, “It’s not really a great foundation,” but it served them well.

To be able to cut the pine planks where they needed to be cut (see them lying flat but sticking out under the lattice?), they first put up the accordion-like walls, then circularized the bottom by suspending the cone-like framework of the roof on the lowest intersection of the lattice.

yurt takes shape cropped.jpg

The roof framework was then disassembled and reassembled up in its proper place, as you see in this photo. The opening in front is for the door of course.

roof supports cropped.jpg

The canvas, having been used twice before and clearly showing wear, tear and rot from four years of storage and getting hauled all over the place, was not in its original very white condition, but it did the job surprisingly well. It wasn’t long before this simple structure began to feel like home. Let’s just take a nice book and sit in the sunshine! That’s Eppie, almost three.

home cropped.jpg


When I came to visit that spring, all was in order. A workable kitchen area with running water, gravity fed from a nearby stream (the red tube hanging over the sink)…

yurt inside Rise Eppie May 2017.jpg

…small bunk beds for the girls along one side…

bunk beds.jpg

…and Lincoln and Julia’s bed against the wall during the day when not in use.

yurt inside May 2017.jpg

As summer went on, the grass came in, making an idyllic front yard. Their garden, with natural fencing to keep small critters out, included strawberries, tomatoes and squash.

front yard cropped.jpg

Probably the most exciting thing that happened that year was on July 25 when power came!

power July 25 2017.jpg

The very first thing they hooked up was a small, dorm-style fridge, which very much improved upon the previous need to continually refresh the ice in a cooler. Oh, the joy of a cold glass of milk!

small fridge.jpg

“Refrigeration!” Lincoln said. “This may have been the happiest day of the whole project to have that modernity. Real running hot water/a shower will probably be the only thing to top it.” They put the full-size fridge near the site of the barn initially, next to that glorious fuse box! To put it in the yurt required a proper gauge wire (that would support a full fridge’s amperage draw) long enough to make the 310-foot trek between fuse box and yurt. That didn’t happen until the following spring.

refrigerator.jpg

You will note the absence of (and have perhaps been wondering about) indoor plumbing. When it comes down to it, until such time as water from a well would run indoors, they could take hot showers at Zach’s house, use water being led into the yurt from the on-site stream for general washing of dishes and hands, and fill and refill large dispensers with potable water from Zach’s outdoor spigot.

But on site there must be a toilet of some kind, and indeed there was, built according to the same specifications Vermont uses to build the privies along the Long Trail. They figured if it was good enough for the state, it was good enough for them. Countless generations of humans have constructed similar structures and managed their personal needs adequately, if not warmly or luxuriously. I daresay this one is a far cry nicer than a lot of its predecessors.

outhouse2 cropped.jpg

Now think about it: If you had to choose between indoor plumbing and electricity, which would it be? How many of us have to choose? How many of us could (uncomplainingly) manage neither for a while and then one-but-not-the-other until both, in their proper time, were a part of our reality?

How much we take for granted every day! How blessed we are!

So, about Aquaman…

If you know me a little, you might be surprised at what I am going to say. If you don’t know me, I can tell you that I am a country girl who paints her toenails, that I love staring at a full moon through the trees on a clear night, that I have 22 ridiculous chickens that live a (some might say) pampered life (they have a heat lamp for the cold nights of Virginia), that a thrill for me is watching a beautiful dog run in the sunshine or hearing the sound of frogs in the creek. I don’t like roller coasters, fast cars, explosions or violence.

But I thought Aquaman was awesome!

aquaman (2).png

I’m just not a superhero kind of girl so this is an odd thing for me to think, say or feel – more than odd, you might say. Unexpected. Shocking even. I like crime dramas that are intelligently done, historical dramas that are reasonably realistic and romantic comedies that are not overly sappy or predictable. I love Blue Planet and Planet Earth (I and II). I love zoos, aquariums, mountains, beaches, lightly falling rain, the soft smile of a child, the velvety fur of a puppy, the natural. I don’t generally go for the glitzy, the fake, the fast, the wicked, the destruction.

I didn’t go see this film unwillingly though. When we went to Mary Poppins last week, we saw the poster for Aquaman and laughed. That’s the poster picture above. C’mon, look at that guy. How unnatural is that! But Samuel wanted to see it, said he “would be happy to go.” The fact that I would even consider it rather shocked him I expect, and then I brought it up again today. Sure, let’s go. I said to myself Someday I’ll look back at the time when Samuel was here and when that day comes, I don’t want to think Why didn’t I just go to the movie he thought would be fun to see? What would have been the harm? Why be a fuddy-dud?

It’s not that I thought it would be any good. I just didn’t want Samuel to think he knows me too well. It’s good to stay a little unpredictable, contributes to an unboring path. And I was curious. What’s all the fuss? Nonetheless I can say honestly that “It was awesome” was the last thing I expected to be saying afterward. Why was it awesome (to me)?

Genuine love portrayed: Love between man and a woman (he of the land, she of the sea – stay with me here) – they meet and love and have a child, Arthur, who is called a half-breed by his enemies later. A mother’s love for her son: She leaves for the child’s protection when he is young, and (back to love between man and a woman) every day afterward the man goes looking for her, hoping she will return, which she couldn’t for a long time because she was trapped. A son’s love for his father: Instead of leaving the scene to save himself, Arthur pulls his dad from his truck after the sea went crazy and tidal-waved it upside down. I love seeing genuine love portrayed because I believe there is such a thing and I love to see it, even in a superhero movie.

Genuine good guys and bad guys: No moral ambiguity, no hidden or not-so-hidden political agenda (I hate it when movies insert their political agendas). No wondering whose side anybody’s on. No sympathy lost on undeserving scumbags. Just good guys who fight valiantly for the good and bad guys who lust for power and don’t care who or how they hurt to get it. (And I don’t mean good males and bad males. I’m from New Jersey where “you guys” is not gender-specific.)

The hilarity of the over-the-top, fantastical creatures in their bizarre underwater world: Who gets to make this stuff up!? How much fun they must have had! For example, the “trenchers” attacking the fishing boat that Arthur/Aquaman and the somehow-also-air-breathing female lead named Mera had used for one of their escapes: Really?! Someone had a lot of fun with this scene (and all the rest) and you can tell. I could scoff, but why? Instead why not marvel at this (yet another) creative way of saying Evil tries so hard to get the better of them! But it does not succeed.

Evil fails to prevail. Of course it fails. That is why we love superheros. They triumph! They conquer evil against the odds. They defy norms and expectations. They survive absurd battle scenes. They encounter yet another challenge and they don’t let it defeat them. They act with integrity despite having cause for cynicism, bitterness and exhaustion. They use strength and power for good, mirroring longstanding archetypes that we know within ourselves hold true. They even make us laugh. And when they have the opportunity to kill the bad guy, what do they do?? You’ll find out. All you have to do is go see Aquaman, even if that’s the last thing someone expects you to do. Maybe you should defy their expectations…

The Icing on the Cake

I don’t mean Icing on the Cake in the figurative sense. You know, the way people say Oh that’s the icing on the cake when they mean the best part of an already good situation, something added that makes a thing better, an enhancement that you don’t actually need but takes the thing up a notch. Such as: My trip was already perfect in every way. The beautiful weather was just icing on the cake.

Notice that the phrase is not, generally, the frosting on the cake. There are exceptions of course, but the idiom that slips off the tongue for most people is the icing on the cake. The difference between icing and frosting is at the kindergarten level of understanding for pastry chefs and aficionados, but I daresay most people would be hard-pressed to articulate their particularities. That might be because the similarities are more striking. They both are 1. Sweet, 2. Spreadable, 3. Useful for enhancing/decorating/topping a cake or cupcakes.

Giovanna Zavell of Drake University begs to differ. She says they although they are commonly confused, they are in fact are “very different” and each have “their own personality.” Icing is thinner, glossier and gets a harder surface after it sets, as when you get eight inches of snow followed by a 40-degree day (so that the upper half inch or so melts) followed by a 10-degree day which makes that melted part form a crust on the surface that cracks as you walk through it. Icing is also called a glaze.

Frosting has more cream/butter, is fluffier and holds its shape. It is also called buttercream. You can spread it with a knife or you can squeeze it out of a pastry bag. Zavell says, “If you want my opinion, choose frosting. Always go with frosting.” But when it comes to food, there is really only one hard and fast “Always go with…” and we all know what that is. Always go with chocolate is just so obvious once you have tasted vanilla ice cream and then chocolate ice cream (I mean, seriously, who can argue with that?).

Now that we’re hopefully clear on icing vs. frosting (you will never mix them up again, right?), you will see that I am not focusing today on icing (though it’s what slipped out of my mind for a title (see how those idioms plant themselves deep in our brains and just spill out!), but rather on frosting. I ended up making two chocolate cakes recently, one for Sandy and one for John. On your birthday around here, you get the kind of cake you want, and both of them asked for chocolate, just sayin’!!

They wanted two different frostings though. Sandy, bless him, wanted chocolate. I know I will disappoint those who need/want exact instructions, but I was in a hurry that day and on autopilot. I mixed (with my new, handy-dandy electric mixer) half a stick of softened butter with some confectioner’s sugar (a.k.a. powdered sugar) (maybe two cups?), a few drops of vanilla, and enough milk (a teaspoon, two? three?) — oh and a couple heaping tablespoons of cocoa! — till it looked like this…

frosting needing more sugar.jpg

…at which point I said to myself No, that’s too wet and added more sugar…

frosting with more sugar.jpg

…to make the right consistency. By right consistency, I mean it is not dripping from the beaters, nor is it so stiff that you need to be Hercules to scrape it out of the bowl and spread it on the cake.

Sandy did not want further decoration on his cake – no silly sprinkles, sadly no coconut and thank God no crushed nuts of any kind. So his cake looked simple and tasted yummy. You can’t go wrong with chocolate + chocolate.

finished cropped.jpg

John, a few days later, wanted cream cheese frosting. For this (since I had better be a bit more specific), I checked with Fanny Farmer.

recipe cropped.jpg

I never put egg white in a frosting before! But hey, Fanny is reliable, and I must say, there was a nice fluffiness to this frosting when it was done. My mixer was wonderful again (what did I do without it??) and gives me the opportunity to show what I mean by drippy.

not enough sugar

This is what it looks like if you have not yet added enough sugar. It drips from the beaters and doesn’t hold the the beautiful shape of the beater swirls in the bowl. With enough sugar, it stays where it lands on the beaters, and the swirls hold their shape in the bowl. Gotta love those swirls!

not dripping


To frost the cake, first put a bit of frosting on the plate like this.

frosting on plate


That way, when you put your first layer of cake on the plate, it doesn’t tend to slide around as much. By the way, frosting a frozen cake is easier than frosting a non-frozen cake. So if you have time to plastic-wrap those layers and put them in the freezer for a while before the frosting stage, do that.

Frost the top of the first layer. Use a non-serrated knife if you want a smoother surface. Note: This does not have to look perfect. It’s going to get covered with the second layer.

frost middle


Add the second layer and frost the sides before the top. Note: This does not have to look perfect. It’s a homemade cake. Imperfections are part of the appeal.

sides first


When you are finished, defy expectations (John didn’t specify further decoration either) and add some prettiness such as colored sugar. There is already so much sugar in this – what’s a little more? It doesn’t change the flavor (or irritate anyone who doesn’t eat nuts and then could not enjoy this cake). I happened to have purple sugar on hand, which is a little more festive than it being plain, but not over-the-top. I hope he approves!

finished with sugar on top cropped.jpg

Straw Bale House: Part 2 (Site)

(This is the second of a multi-part series that will document the development of Lincoln and Julia’s property, the first having been entitled “Lincoln’s Pentagonal, Straw Bale Insulated House in Vermont.”)

Say you want to live in the country. You have been dreaming about and looking at properties for years. You finally find a piece of land that has privacy from almost every side and a river a stone’s throw away, yet is only a mile from town. You see the view, the potential. You see the price tag, and it’s doable. On this solid piece of earth, you imagine this here, that there, where the sun will rise, how far a walk it will be to that lazy river one fine day when you are all settled in. Images take shape in your mind. With a canvas, an artist can paint.

first view.jpg

There was snow on the ground when Lincoln and Julia first set foot on the land they would come to call home, land that would come to include their yurt, greenhouse, beehives, garden, barn and of course their pièce de résistance: a pentagonal, straw bale insulated house. In their heads and then on paper they drew up a rough schematic plan showing where everything would best be situated before they even closed on the deal. We’ll come back to this.

schematic.JPG

Sometime later they calculated many years’ worth of firewood standing/leaning/lying on site (that would not have to be paid for by the cord) – maybe a lifetime’s worth if they were good stewards of the land. Bonus!

Was there any question that this piece of land was the right one, that buying it was a good decision? Any reason not to jump in with both feet? Absolutely. Skepticism was strong. Lincoln worried that his excitement might rose-color-blind them. He knew he’d be a fool not to ask: What’s wrong with it? What are we not seeing?

Snow is not unusual in Vermont in the wintertime, and it does present assessment challenges. For example, why is there a cattail here in what seems to be a clearing? How wet is it underneath?

cattail_LI.jpg

The cattail was worrisome. They talked to the neighbors across the street, who described the land as “kinda swampy.” It was, however, a swamp on a slope. Let’s think about that now (and think long and hard they did): A swamp on a slope can be only so bad and should be manageable. They decided to deal with it. So they worried as they dreamed and they dreamed as they worried.

Before making a decision, they walked the land again after a spot of warmer weather. If they had been excited before, they were even more so when they saw plainly in front of them all they wanted: river, rock, field and forest. They loved it in every way above all other pieces of land they had seen. The big piece of exposed rock overlooking the river put one word in Lincoln’s head: Swoon.

first view of river swoon.jpg

They knew it was just land, land that dropped off at a steep angle from the road, land with no house (no dwelling of any kind), no driveway (barely a spot to pull off on the side of the road to park, so even an RV wasn’t a temporary option), no electricity, no well, no septic. They knew it would require countless hours of labor, more money than they at that moment could lay claim to and years of patience before the word finished became an accurate descriptor. Yet in they plunged!

Then winter weather kicked in again. Their first campfire says Determination loud and clear, but the first two weeks of snow and cold were the worst. In Lincoln’s words, “The first two weeks on the land sucked. Sucked bad. Probably why we take some other stuff in stride: nothing compares to how that was.”

first campfire.jpg

Nonetheless Julia’s TA-DA says Ours! as she shows off their first campsite.

tada home.jpg

That first night inside the tent, with Rise at age four and Eppie at two, they began an adventure that will last for years.

first night.jpg

The yurt would go up first, becoming a temporary place to sleep, cook and plan the next stage of the ongoing, unconventional, ambitious project they set their minds to. My granddaughters will grow up watching their amazing, energetic, creative parents continually researching, learning new things, doing the next thing, discussing options, working, resting, researching more, learning more new things, meeting challenges, staying flexible, correcting mistakes – ever unfazed by inconveniences that many (most?) of us would not so gladly endure and with a measure of patience that comes with a prize. Three prizes really: peace, self-reliance (though they are forever grateful to all the people they have relied on) and debt-free ownership of their dream home.

On the one hand Lincoln would like it to be clear that they do not live on a massive bucolic estate, rather on “a haphazard swamp where everything is half built or falling apart or both!” On the other he holds fast to Gradatim Ferociter*: slowly, step by step, with ferocity.

_________________________


*coincidentally the motto of the rocket company Blue Origin

Pierogi Production Party in Virginia

Lynn and Billy are Pierogi Pros. There is no thinking required following the question: How about if we make pierogies when we come to your house? Yes!

The first question is How many cans of sauerkraut? Lynn routinely uses 15 or 16 for her own party (and made 974 pierogies last time!), but that seems excessive for me and Mom. In February we used five cans. For the December party we settled on three (and maybe we’ll be sorry, but we’ll adjust next time if we are). Imagine the difference in the number of little footballs you have to make ahead of time and the number of pierogies you line up on the pan. Here’s Mom doing an excellent job! Look at those perfect rows!

IMG-20180211-WA0015 (2).jpg

Making pierogies is not for the faint-hearted or weak-willed. It’s complex, time-consuming and has various nuances of technique that Lynn and Billy have perfected over the years. Nonetheless, as they say, if we can do it, so can you! What follows is a brief pictorial overview of the process. You are invited to ask questions of me or Lynn if something doesn’t make sense.

Day One:

Make the potato-cheese filling and the little cabbage rolls. You do this the day before because 1. It spreads out the work and 2. It allows time for the fillings to cool, making them much easier to work with.

Filling for Potato-Cheese Pierogi

Sauté 2 large onions in 2 sticks (1 cup) butter until just golden. Add 3-4 cups mashed potatoes, 2 (8-ounce) packages softened cream cheese and salt and pepper to taste. An electric mixer is great for this. We used the stand mixer. Let mixture cool, put in a bowl, cover and refrigerate.

Filling for Cabbage (Sauerkraut) Pierogi

Melt 2 sticks (1 cup) butter in large pan. Add 2 large (27-ounce) cans sauerkraut that has been rinsed and drained, and salt & pepper to taste. Cook slowly (low heat) for about 45 minutes until sauerkraut is soft. Let cool, put in a bowl, cover and refrigerate.

Day Two:

First, make little cabbage footballs using your hands like this. Lynn calls them rolls or logs, but their ends do tend to taper down like footballs, just saying…

This slideshow requires JavaScript.

These little footballs will fit in the form like this.

cabbage footballs in form.jpg

But let us not get too far ahead.

Once your cabbage footballs are formed, clear your workspace and gather your tools. You never saw my butcherblock so clean! This is, in fact, a good opportunity to get the dust and you-know out of those corners and crevices, a bit of pre-production deep-cleaning, one might say…

equipment_LI.jpg

You see three rolling pins. Billy’s is the big, black, marble, heavy, hefty one. You will see why. Mine are the two rather average wooden ones. I didn’t know which one of those Samuel would prefer, and he did not show up until the last minute, being involved with his coding during every other possible minute, so I brought them both out.

The potato-cheese mixture in the bowl on the butcherblock is clearly an ingredient and not a tool, but since it didn’t get its own set of photos while being made (and secretly thinks it’s better than the cabbage footballs), it snuck into the photo here to make sure, at the very least, that it is not forgotten.

Now you are ready to call the troops in and get going with the full operation. These are the ingredients for the dough, all set up in their own space. We are nothing if not organized! Okay, Lynn is nothing if not organized!

IMG-20180211-WA0000.jpg

The recipe says:

Dough

Combine 4 cups flour, 2 eggs, 4 tablespoons melted butter, 1 ½ teaspoons salt, ½ cup water. ½ cup milk. and roll out thin. Transfer to pierogi forms. Fill with filling. Top with another thin layer of dough. Press with roller. Trim away excess dough.

I mean, how simple is that?

Here it is again, starting just before “roll out thin…” This is enough mixing in the bowl. Billy did the rest with his hands.

dough in bowl2.jpg

And then he divided that amount of dough into four pieces.

dough divided.jpg

Then “roll out thin.” When we say thin, we mean thin. You go from this…

dough to roll (2).jpg

…to this…

dough rolling.jpg

…to thin enough to fit on the 14×14” form.* Move it gently and carefully.

first layer 2.jpg

Billy is the Official Dough Roller. This task requires strength, endurance and no small amount of organization (is this the dough you rolled out twice already? – all looks the same to me!). This guy knows what he’s doing. His smile really says Trust me, I rolled out that dough twice already. You don’t argue.

Billy and dough.jpg

For the record, Samuel followed Billy’s dough-rolling lead (which dough was that again?) and will someday be glad he participated in this craziness, even if right now he would rather be coding.

Samuel rolling dough.jpg

I squeezed out potato-cheese filling and placed little cabbage footballs in the form and pressed edges together and in general tried to be useful when not temporarily holding up the works with my (frequent) “hold, hold, hold!” while I stopped to take pictures, a habit I expect was not altogether appreciated at the time, but here we are with (yes, folks!) pictures!

Once you have placed the first layer of dough on the form, you milk the edges (with milk) to help the top layer of dough stick better…

milking the edges.jpg

…and put the fillings in. Lynn, Master Organizer (aside from deferring to Billy on the question of Has this dough been rolled out twice already?), presides over the squeezing out of the potato-cheese filling.

Lynn with potato.jpg

You see in the next photo that the portions are not exact and the shape of the dollop is not the same in every one. They are not perfect. We are not perfect. This is not an automated production line in a pierogi factory. We are not automated machines making every dollop the same. That squeezie thing has a mind of its own sometimes, and getting it to break off the desired quantity is a practice-makes-respectable kind of thing. This is my home and we are perfectly at ease with (at least certain kinds of) imperfections. Imperfections make it real and fun and challenging and wonderful and everything a store-bought pierogi can’t be.

potato filled.jpg

Once the form is filled, you put the second layer of dough on top

second layer on top.jpg

and take the mini-roller and press against the semi-circular edges of the form. You could manage with one of the regular rolling pins or even a straight-sided glass jar.

IMG-20180211-WA0007

Lynn likes the wider side of the roller and I like the narrower side. Either way, the job gets done and the edges are pressed together enough to hold.

rollig edges.jpg

You have to press hard enough that the pierogies practically break away from the form on their own (see the orange of the form showing through?).

pressing2 (2).jpg

And then you can remove the excess dough, which gets re-rolled once and once only, thus the previous “which dough was that again?” to keep track of the dough’s cycle.

pulling dough.jpg

You remove the excess dough carefully, then take the whole thing over to Mom and her waiting tray, and flip them out. (Not the standard usage for the phrase “flipping out,” I grant, but the right phrase nonetheless.)

flipping and tray waiting (2).jpg

See how wonderful they look! Like Mary Poppins: Practically perfect in every way!

IMG-20180211-WA0011 (2).jpg

We kept track of numbers this time by writing with a sharpie on a corner of the waxed paper that divided the layers (three layers max). C=Cabbage  P=Potato  (But you knew that.)

marked paper.jpg

Layering the pierogies with waxed paper and using a little cornmeal on the surface helps keep them from sticking to one another. You freeze them right on the pans like this. When they are frozen solid, you put them in bags and label them.

We of course couldn’t help it and had pierogies for lunch. How does one say YUM most emphatically!!?? And between my freezer and Mom’s we have the remainder. To give you an idea of quantity, we made 67 cabbage pierogies using 3 cans of sauerkraut and 166 potato-cheese pierogies using 4 pounds of potatoes. That’s a far cry from Lynn and Billy’s 974 total, but Mom and I and everyone who eats at our tables over the next half year or so will enjoy every last bite of these. Plus, we know it won’t be long until Lynn plans a trip and says How about if we make pierogies when we come to your house? Yes!


*In case you are interested in this form, here is the info on it.

form info (2).jpg