Falling to Ruin, or Not

The cottage on my property that Bradley and Beth built is a beauty. I am certain that the way its design elements come together visually strikes people as they look through their options on the Airbnb and VROB websites, and that they choose it because of how beautiful it is.

cottage.jpg

A guest last week who is an architect by trade wrote in his review:

“The house is exceptional in its design. It is nestled among soaring trees with their lush green canopy of leaves, which are awesome to behold from within this all-glass pavilion. The layout is smart for the traveler who needs a few days of accommodation. The kitchen is compact but well equipped. The living space gives a group the chance to spread out. The bedroom is loft-like and from its vantage point, you feel as though you are in a tree house. If you’ve never been to Charlottesville, your first time ought to be spent in the heart of the city. However the second time and forever after, this is the place to be!”

(And he went on!)

The design is not only unique, but pretty much every aspect of the construction is custom-made. The windows, for example, all the trapezoidal and rectangular ones, are made with cherry wood. So is the side door that leads to the deck, also handmade by Bradley. I remember when its pieces were laid out on the basement floor. When it was first installed, it looked like this:

Tzcherry door Brad made.JPG

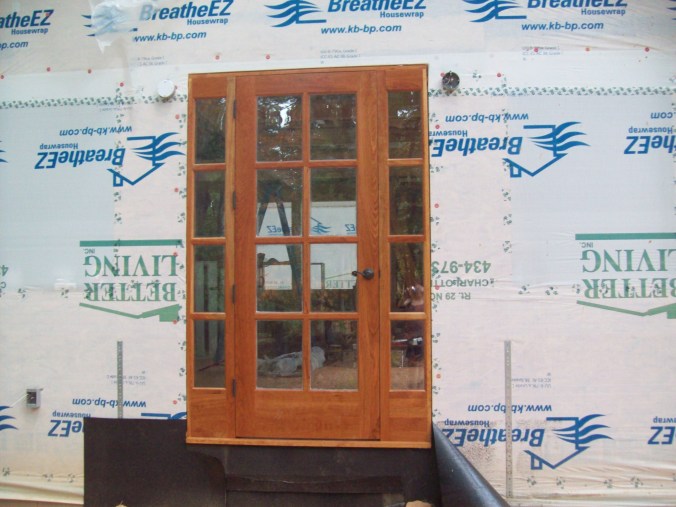
I repeat, this is not a store-bought or catalog-ordered door. Bradley cut, routed and connected every piece. Seven years later, it still blows my mind when I look at the detail and the craftsmanship.

But built things do not last forever in their original condition. When Bradley was here in May, he said, “Mom, if you want those windows to last, you need to refinish them.” I want them to last. A marine grade polyurethane will not protect the wood forever, but it’s the best protection on the market for a few years, when I will do this job again. These are the second-floor windows as I was refinishing them this week (before the rain came!).

upper floor windows.jpg

When you take care of things, they stand a much better chance of being around, being useful, being still beautiful in years to come. Maybe in a hundred years, this cottage will still be standing tall and gorgeous. I hope so!

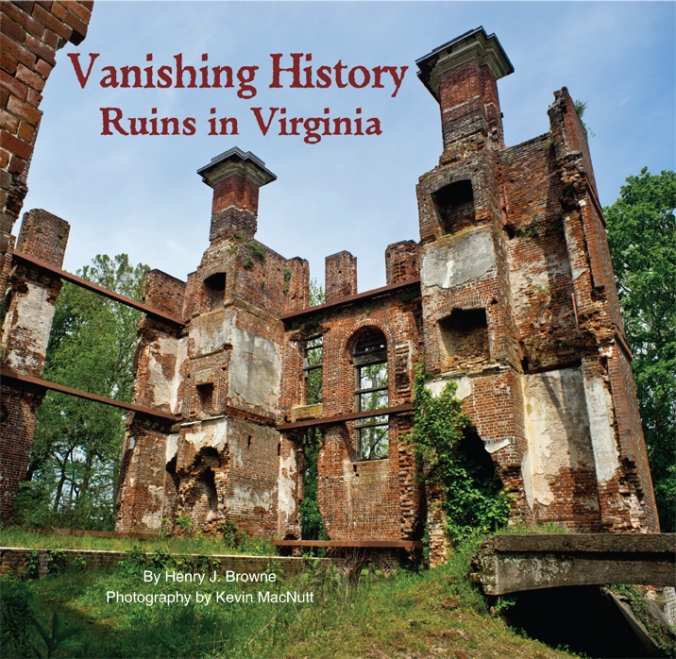
Such is not always the case. This past year I had the honor of publishing Hank Browne’s book, Vanishing History, Ruins in Virginia.* Hank, another architect by trade, has a passion for discovering and calling attention to ruined structures like bridges, railroad stations, mills and kilns. The ruins he featured are exceptional in their own way; all are well more than a hundred years old and showcase the workmanship of those who came before us as well as the creative and skillful use of materials. Nonetheless all are abandoned, neglected and in a sad state of disrepair.

The remains of the Wheelbarger-Rumsey Kiln once produced enormous quantities of limestone for use in mortar.

Rumsey.JPG

Look at the shapes and colors of the stones that make up the front face of this structure. They were dug out of the earth, hauled to the site and carefully put in place. Together they look like a beautiful puzzle, with each stone placed in its perfect spot, but the work of choosing and fitting them together required a careful eye and lots of hard work.

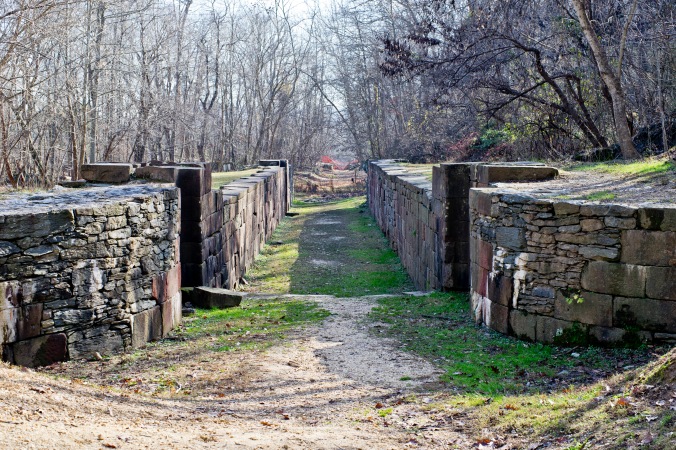
Same for these stones of the Patowmack Canal. Why some stones are giant blocks and others are thin slabs is a mystery to me, but I do know that the rounded walls were to help the boats navigate into the opening without hitting sharp corners and damaging their hulls. The recesses in the wall on both sides indicate where the doors of the lock were once attached so that the water level could be adjusted up or down.

Patowmack.JPG

The dilapidating train station at Pleasant Valley was built in 1874; its pleasing lines must have been a welcome sight for those who had come to the end of a long journey. But the hugs, smiles, first words, last words and tears that happened here are long since past. The damage to the right-hand side of the roof is not a good sign. When rain and other unwelcome elements finds their way into the interior, it’s the beginning of the end.

Pleasant Valley.JPG

You can surely think of some structures near you that are likewise falling apart. Not all of them can claim exceptional design or expert workmanship, but all were built with purpose and hard work. The people who hauled the lumber and hammered the nails were very likely tired at the end of the day!

It’s hard to look at photos like these and not think (at least a little) about the inevitability of time passing. We see here plainly – and in our own areas undoubtedly – what happens when people stop paying attention, when buildings are untended, neglected or abandoned, and nature is left to its own devices.

This makes me think about other things that need occasional attention or careful tending: not just buildings, but the people around us, the ones we walk alongside day by day. They have their own beauty despite their age, their own mysterious aspects, their vulnerable places too, where unwelcome elements can do incremental damage. Every time you see them or talk on the phone with them or send them a text, you have the chance to do good: to serve them in some way, to speak encouraging words or to tell them how much you appreciate them, to bring cheer.

You don’t have to, but you can. If you do, I’d say the chances of that relationship getting strong or staying strong – not crumbling or dilapidating or falling to ruin – are way better.


*https://www.amazon.com/Vanishing-History-Ruins-Virginia-Browne/dp/0999131001/ref=sr_1_1?ie=UTF8&qid=1535664727&sr=8-1&keywords=vanishing+history+ruins+of+virginia

Crackers Revisited

Late in the afternoon yesterday I went to visit my friend Hank Browne. First thing (after hello) I said was, “I have a little something for you. These are my homemade cheese crackers,” and I handed him a little baggie full. Never having had these crackers before, he said, “Now why would you make these when you could just buy a box?” I said, “You try them and then talk to me.”

This is the photo of Hank that we used on the end flap of the jacket of his book.* I love the fact that he is actually holding a bagel in this photo but we cropped it out.

hank browne bio pic4.jpg

Sometime after I left him with my crackers, I texted him and said, “I need to know what you think of my crackers.” He said simply, “You are my cracker maker.” I think he liked them.

Last week my mom called me to ask for “the cracker recipe.” She did not have to tell me which cracker recipe because only one matters in my world at the moment. There’s a reason you stick with a recipe. It works and it’s wonderful! Imagine sharing /savoring/devouring some of your favorite cheese alongside homemade crackers – these homemade crackers.crazy 2 baked on rack.jpg

These crackers have texture, flavor and the possibility of crazy shapes if you are so inclined. They can take cheddar (Cabot if you please), parmesan, Monterey Jack or just about any hard or semi-hard cheese. I think asiago would be great. Jarlsberg even.

About two years ago I wrote about these same crackers, but at the time I thought it was enough to present the recipe and show what they looked like finished. See how much I’ve learned in two years? Lots of pictures are good! Here we go. Still, we will start with the recipe. It’s from the King Arthur Flour 200th Anniversary cookbook. Back in the day I thought it was very cool that I got one of their first-run, limited-edition 3-ring binders.

All you need on this page is the list of ingredients, but feel free (later) to compare their instructions with mine. I don’t even look at the instructions any more. Oh, wait. Perhaps I had better check!

recipe.jpg

That’s right. They wanted you to roll out the dough on a floured surface and then transfer the crackers one by one to the baking pan. I did that for a long time. Terribly time-consuming, and as you might have guessed, I have other things to do. So a few years ago I came up with a waxed paper method I will show you, and just yesterday (lucky you!) I realized an even better way to get the rolled-out dough to the pan. I can’t believe I didn’t think of this before!

First, grate your cheese. Use the finest hole of the grater you have. This is mine that I got in IKEA years ago. I like it because 1. It has its own bowl that the cheese falls into and 2. it has a second top with bigger holes that I use at other times for other things. My sister Lynn has the same one and she loves hers too. But my mom never liked hers and gave it away. To each her own.

grater.jpg

Of course if you are using parmesan or romano cheese and it came already grated, you are good to go on that point. I chose cheddar this time because Cabot was on sale this past week and I bought four of the Seriously Sharp bricks, maybe five.

Also, I tripled the recipe because I know how these disappear. If I am going to go through this process and make something that doesn’t go bad in three days (not that they will last three days even tripled!), I might as well make enough to last a while and be able to give some away. You want to share this kind of love.

Put your cheese in a large bowl and mix in the cornmeal. I happened to have yellow cornmeal but you can get white also. The one I had in the house yesterday is also a somewhat coarser texture than I have had in the past, but it doesn’t matter unless you care about them being a finer texture in the end. They are good either way.

cheese and cornmeal in bowl.jpg

Naturally your cheese is a little moist, so mixing the cornmeal into it first helps keep the cheese from clumping. We don’t want clumps.

Next add the flour. This additionally de-clumps.

cheese flour and cornmeal in bowl.jpg

Add the rest of the dry ingredients (i.e. everything else except the eggs, oil and water). Mix in. I did not add the Dijon as suggested in the recipe, but I’m sure it’s good.

The recipe says to mix the eggs, oil and water together separately and then add it to the dry ingredients. You can do this if you want but it works just as well for me to break the eggs right in the bowl and then pour the oil and water in and stir it all up. Two things: 1. If you are worried about shells getting in your crackers (you don’t want shells), break the eggs in a separate small bowl and pour them in, and if you are going to do that, you might as well beat them up right then with the oil and water before adding to the big bowl. I did not worry about shells because my hens are making good strong shells. Your call. 2. I always use extra virgin olive oil (EVOO, as the pros call it).

mixing in eggs, oil, water.jpg

This mixture looks so yellow because of the yellow cornmeal as well as the very yellow yolks my hens are making. Yours might not look this yellow.

Here is what they dough looks like with all ingredients mixed together. You don’t want it gooky, but it should hold together. If your dough doesn’t hold together nicely or seems too dry, you can add a little water to it. But don’t make it gooky.

mixed in bowl.jpg

Now the fun part.

I did the rolling out part three ways. You can choose which way seems best to you.

  1. Between two sheets of waxed paper
  2. On one sheet of waxed paper with flour on top of the dough
  3. Between a sheet of parchment paper and a piece of waxed paper

All of these methods allow you to transfer a full pan’s worth of crackers to the pan all at once. The two-sheets method is what I discovered a few years ago. It has the advantage of being less messy than the old floured-surface method but the bottom sheet can wrinkle a bit. I’ll show you.

Take about as much dough as comfortably fits in your hands mold it to a flat ball or oval and put it on the paper.

dough on waxed paper.jpg

Put the second sheet on top and smoosh it a bit.

dough between waxed paper.jpg

Now use your rolling pin to roll it out. See, no messy floured surface. If you are careful you can re-use the paper for the next ball of dough.

dough rolled out betweem waxed paper.jpg

Keep rolling until your dough is about 1/8-inch thick. Remove the top sheet and flip the whole thing onto your silicone-mat-lined baking sheet. If you don’t have a silicone mat, grease the pan.

The first time I did this, I cut the cracker shapes first, then flipped it. You should not cut on a silicone mat. In the end I found a better way, but this way first.

I removed the top sheet and cut the shapes I wanted. The tool I have is called a Raedle, which is basically a wheel with a zig-zag edge connected to a handle. The one that says Grand.. on it was my grandma’s. It has been used a lot over the years, thus the chipped off name. The other pictured here I found in an antiques shop near me called A&W and had to decide which of my children to give it to. I settled on Samuel because he made these crackers for me some years ago when I was writing my book. Batch after batch sustained me through that project and I’ll never forget his kind service to me. This one is a beauty. If you find one at an antique shop, buy it. If you don’t have one, a pizza cutter works fine.

raedle.jpg

The dough sticks to the paper which makes the flip possible, but do you see how the paper can get a bit wrinkly? This happened as I continued to roll out the dough to the thinness I wanted. It does not affect the crackers, but maybe that bothers you.

removing paper.jpg

The bottom sheet may wrinkle less if, on top, you use flour instead of another sheet, but either way the wrinkling is not a big deal. Using waxed paper also means you have to be able to flip the paper on to the pan as I will show you. If you are shy of flipping, use the parchment. You can bake right on it. I’ll show you that later.

For now, this is the flipped waxed paper on the pan.

flipped cut dough.jpg

Little by little I carefully peeled what is now the top paper away.

peeling paper back.jpg

There are always a few stragglers that don’t want to stay with their fellows. See that one at the top? Every crowd has a few renegades. Just put them where you want.

stragglers.jpg

Brush water on the dough before you salt the crackers. I couldn’t find my little brush so I dipped my hands in a little bowl of water and used my fingers to wet the dough – just enough to make the salt stick. Use coarse salt.

salted.jpg

And into a 400-degree oven they go. The original recipe says 375, but 400 works for me. You bake these until they are as dark as you like them. I love them a little darker but was in rather a hurry yesterday so these are not as dark as I would normally make them. Still good though!

baked first pan.jpg

Transfer them to a rack to cool. Try one or two. Stop if you can. Oh yum.

baked on rack.jpg

Now back to the other rolling-out methods. First, one sheet of waxed paper only. Put flour on top, rub your fingers over it to smooth out the flour a bit and then roll the dough out.

flour on top2.jpg

You might need to keep adding a bit of flour until you get to full size and desired thinness.

lternate with flour on top.jpg

This method still requires you to flip the paper onto the pan. I found that cutting the cracker shapes before flipping made it trickier, and I know you should not cut on the silicone mat for fear of damaging it but I decided to take the chance. I flipped the uncut dough, removed the paper, then used the Raedle gently. It’s easier and I managed to not damage my mat, but then I remembered parchment paper. That’s the ticket!

Cut a piece of parchment paper that will fit your pan, roll out the dough either with waxed paper on top or with flour on top. This shows waxed paper on top.

parchment.jpg

Then simply slide this paper onto your pan. No risky flipping. No pre-cutting of shapes. No worry about mat damage.

This is the parchment slid onto my pan, which you can’t see because I cut the paper too big.

parchment ready.jpg

So I trimmed the paper.

parchment cut.jpg

Brilliant. Cut shapes, brush with water, sprinkle salt, and into the oven it goes just like that. Regarding shapes, have at it – standard squares or rectangles, maybe diamonds as you see above, or a little more free form as below. It was fun to make the arc cuts, but in the end the crackers were pretty square anyway. You can use cookie cutters if you want too. Either cut them on your counter and move them (tedious but the most efficient use of the dough) or cut them on the parchment and just leave the in-between parts to eat on the side later.

You don’t have to separate the crackers after cutting but before baking. The baked crackers break apart easily.

I know it’s just as easy to buy a box. But the other night I took the last few of the last batch of these, the ones my mother made last week and gave me, to the airport when I picked up my son Samuel. He polished them off well before we got home, at which time he asked, “Do you have any more crackers?” I knew there were no more of the homemade ones and started showing him his choices, the boxes in the cabinet. He stopped me short. None other would do.

You try them and see if he’s not right.

free form.jpg


*Hank’s book is Vanishing History, Ruins in Virginia, published last year by my little publishing company, Paper Shoe Press. You can find it on amazon!

low res Ruins cover image Browne.jpg