Any Berry Tea Cake

Last week I had a request for my cottage from a guest who has been here several times before. Crystal’s note included: My daughter and myself absolutely looove that cake you make. It’s my birthday and my friends are trying to bring me to your place tonight. I will pay extra if you have one of those cakes laying around! I know what cake she means.

There’s always something freshly baked under the glass dome waiting for my guests, and sometimes it’s this Strawberry Ripple Tea Cake. (I am not sure what the difference is between a coffee cake and a tea cake, but we’ll just put that point of pondering in the category of Things I Don’t Need to Know.) The recipe came from a hardcover cookbook sitting on my shelf called Old-Fashioned Home Baking, back when (decades ago!) you got recipes either from someone you knew or from some printed material – usually a cookbook or a magazine.

RECIPE cropped.jpg

If you know me even a little, you know that I am all for tweaking/simplifying. This recipe, for instance, calls for making a thickened mixture using strawberries or raspberries. I might have done that the first time, but then I realized it was basically jam. Henceforth, guess what, jam it is! How much simpler and just as yummy.

Also it calls for one large baking pan, but why not two smaller pans? Why not muffin tins? I’ve tried it numerous ways, and with strawberry jam, raspberry jam and this week (on account of a bargain jar) blueberry jam. All good! This recipe is a keeper, and simpler than it looks.

Mix together the 2 ¼ cups flour and ¾ cup sugar. And whatever you do, use butter, not margarine! (I wonder when decent recipe books stopped suggesting margarine as an alternative…) Use a knife to cut up the cold butter in the bowl with the flour and sugar, then a pastry blender till it resembles “coarse crumbs.” My half-cup set aside looked like this.

crunbs cropped.jpg

To the flour/sugar/butter that remains in your bowl, add the baking powder, baking soda, egg, salt and buttermilk (or sour milk, which is nothing more than milk with a teaspoon or so of vinegar added to it, no kidding; vinegar will sour the milk in no time).

Stir this up, just enough to blend. Overbeating will not make a better cake.

Here’s where, in a hurry, I forgot one of the key steps of this recipe. You are supposed to put most of the batter in the greased (and in this case springform) pan(s), then the fruit, then blobs of the remaining batter, then the crumbs. I just spread the batter in my two pans…

batter in pans.jpg

…added the blueberry jam (about ¼ cup per cake, a little more would not have hurt it)…

jam on batter.jpg

…spread the blueberry jam…

jam spread.jpg

…and topped it with crumbs.

crumbs on batter.jpg

It would have been better to mix that jam into the batter a bit, even swirling it in with the blade of a round-tipped knife, before putting the crumbs on top, even if I bypassed the blobbing step. But as my sister would say, “Oh, well!”

The forgetfulness of the baker aside, the result was not so bad.

cake cropped.jpg

It makes a terrific cake for someone who is having a stressful time, or for a neighbor who is always doing kind things for no seeming reason, or just because for people you love, or (oh, right!) for yourself! It is not overly sweet or messy, not trying to be splashy or gorgeous. It’s simply light and moist and delightful with the freshness of fruit and the tender buttery crumbs. It says, “How about a cup of tea or coffee, a slice of this goodness and a few minutes of relaxation?” Some days, sometimes, that’s just perfect.


__________________________

*Better Homes and Gardens Old-Fashioned Home Baking, 1990, Meredith Corporation, Des Moines, Iowa

Noodle-Pillows Your Way, or Spaetzle 1-2-3

On the way to town yesterday, I was asked “Is driving easy?” by my six-year-old granddaughter Rise. It’s easy for me, I told her, because I’ve been doing it a long time. For someone who just started driving, it’s not so easy. If you make scrambled eggs every day, after a while you can have a conversation, straighten the countertop and scramble eggs at the same time. Same for anything: The more you do it, the simpler it seems.

I used to make spaetzle once in a while for a treat, but more and more I find myself reaching for the tool (this is a good one) that turns eggs-flour-salt-water into the tenderest noodle I know. They are so soft, they should be called noodle-pillows. Spaetzle is the base for a wonderful dish called Kaesespatzin (literally cheese-spaetzle or cheesy noodles), which is simply cooked and drained spaetzle layered in a bowl (three layers) with shredded, imported swiss (like Jarlsberg or Emmentaler) and topped with a lot of onions sautéed till super-soft in butter. My friend Claudia’s family ate this dish every Friday for her entire childhood – that fact all by itself used to remind me that it can’t be that hard.

Plain spaetzle are great alongside any roast that has gravy or as a side dish with just butter.

in bowl.jpg

In a nonstick pan on the second day, they roast up beautifully with a little more butter. Last week at my daughter’s I used a can of pureed pumpkin instead of the water in the recipe – you get light orangy-colored spaetzle with a mild pumpkin flavor – try this with butter and tell me it’s not yummy!

pumpkin spaetzle.jpg

If you study the spaetzle in the two bowls, you’ll see that they are not only a different color due to pumpkin in the second, the spaetzle themselves are different. That’s because my daughter’s spaetzle maker has smaller holes (half circles). Hers is like the one on the left (below); the one I usually use (and prefer) is the one on the right.

makers cropped.jpg

This week with the spaetzle I did something new. I made them as usual and combined them with the cheddar cheese sauce I make for mac and cheese (which is essentially a white sauce with Cabot cheddar added).

Spaetzle are also better for us than pasta from a box because you make the dough with eggs. Yes, the woman with 22 chickens is suggesting a use for eggs – imagine that!

What I really want to say is that making spaetzle isn’t that hard. Like anything else, do it a few times and you will develop a rhythm. They will be so easy and so delicious you will wonder why you don’t make them more often. And then you will make them more often!

The basic recipe I learned years ago used a ratio of one egg per one cup of flour. For my family I usually made three eggs and three cups of flour, then a teaspoon of salt and as much water as makes it the right consistency. (Start with a third cup of water and go from there. Don’t worry, I’m walking you through this.) But before you start making the dough, get a Dutch oven (large) pot of water going on a high flame. You need the water at the boiling point.

Over time I found I liked more eggs proportionally for the dough, more like a 4:3 ratio (eggs: cups-of-flour). If you use three (3) eggs, you will need more water. If you use four (4), you will need less. That’s why I can’t be overly specific about the amount of water.

The amount of water you add should make the dough begin coming away from the sides of the bowl, like this. (You didn’t forget the salt, right?) If the dough is too wet (too much water), it will drip through the holes of the spaetzle maker and turn into a disintegrated mess in the pot. If it is too stiff (not enough water), it will stay in a tight ball and resist going through the holes. We can’t have resistant dough now, can we? This is the regular dough.

mixing cropped.jpg

This is the dough made with pumpkin.

pumpkin spaetzle dough.jpg

Position your spaetzle maker on top, fill the little bucket,

into the pot.jpg

and begin sliding back and forth. The spaetzle come out through the holes and plop into the boiling water.

through.jpg

If you have a friend or family member nearby who can keep the water moving with a long-handled spoon back and forth in the water alongside the spaetzle maker, that would be great. If you are by yourself, not the end of the world. Just give it a stir when you refill your bucket.

Once all the dough has gone through the holes and into the water, go to your kitchen sink, taking the spaetzle maker with you (both parts), and clean it. Trust me, you will be glad you did this before all that dough dries in the cracks. Use a little scraper rather than a rag or a sponge. The amount of time this takes, let’s say five minutes (though ten in the pot won’t hurt them), is about right for how long it takes the spaetzle to cook in the water.

cleaning cropped.jpg

They will be looking like this in the pot. You probably will need to turn the flame down (or it might boil over and you don’t want a mess). I usually add salt to the water too, by the way, just as when I cook pasta.

in pot.jpg

Now drain and serve in any of the above-suggested ways, or however you like.

By the way, in case you were wondering, spaetzle is pronounced shpet-zle, not spetz-le. Have fun! I’d love to know how else anyone dresses them up!

Cut Marks

When I was a kid, we had pizza every Sunday night. Tradition on Sunday was: Eggs for breakfast, then a mid-day dinner invariably including macaroni with red (tomato) meat sauce, often with Italian sausage or meatballs or eggplant parmigiana and a tossed salad on the side. This was a more formal meal than during the week, thus Sunday night being Mom’s night off from having to cook.

If we got a couple of pies at the local pizzeria, my dad asked for them uncut. He would slide them out of the box and into our preheated oven, straight onto the rack. In this way he attained optimal crispness (to his own point of perfection), a thin, crispy crust being a requirement. Plus, he always wanted his food hot (not warm, hot). If we didn’t order out, he would make pizza from scratch with purchased frozen bread dough that we let thaw and he then rolled out himself. And even though we only ever had cheese on pizza – freshly grated of course, and heaven forbid we spoil it with pepperoni or any veggies – it was of course delicious.

Maybe I learned to love pizza then, maybe I would love it anyway. No matter, it’s an all-time favorite for sure. I’ve made it more times than I can count. When my kids were growing up, I often made it for lunch, once a week at least I’d say. All three of my pans look like this, confirming way more than a few uses.

my pan centered.jpg

While my friend Fred was here last week, we made pizza one night because he wanted to practice making the dough himself. When I pulled the pans from their storage place alongside the cutting boards, I offhandedly called attention to the many, many cut marks as evidence of the many, many pizzas having been made on them over time.

You know how it is with offhand remarks. You forget you even said anything. I never gave it a second thought.

When he returned home to Kentucky, he wanted to make pizza. He made the dough himself and was super pleased with how it came out. Bravo, Fred!

Fred's pizza cropped.jpg

Our little pizza lesson paid off, I thought, and now he can make his own whenever he wants, and perfect his dough and play with toppings (using my recently developed pizza pile method of course!). Good for Fred! Good for his family!

Then he sent me a photo of his two slices on a plate, and later a photo of his cat licking the drippings off it. Clearly this is a man who enjoyed his pizza!

Hours later I got this photo.

Fred's pan.jpeg

Yes, that’s a pizza pan. When I saw the holes I thought he was going to tell me about whether the crust was crispy or not on account of those holes, or maybe how they affected the slide-off onto the oven rack. I was not expecting thoughts on the cut marks. He said:

My first cut marks.
I didn’t have a pizza baking pan so I bought this one today. After using it and cleaning it my first thought was that I shouldn’t cut pizza on it as it leaves cut marks. Then I thought of how you proudly reminisce of the cut marks on your pans. Sometimes we leave marks where we have been, better than shiny things with no history or attachment. 

Amen. Leaving marks where we have been is a thing to ponder. Cut marks are perhaps not the best analogy, but if you can get past the sharp-object implications and onto the idea that the blade connected with the pan in such a way as to leave a permanent reminder of that connection, then maybe we are onto something.

First of all, yes, better to connect and be left with a mark than to stand alone – perhaps even shiny! – but still lonely, untouched. So what if we look perfect or have a perfect job or eat a perfect diet but have no meaningful relationships. The marks we gain through valuable personal interactions, through caring for someone besides ourselves, make us only more attractive – especially and most importantly to eyes that can see beyond the surface.

But, pizza-pan-cut-marks analogy aside, the marks that matter are often not visible.

I’m thinking about the people I know and the marks they have left on me, more than I can possibly list, but for starters: those who don’t just wait for me to finish speaking so they can say their bit, but instead really listen (how many people really listen?), those who brought (and continually bring) laughter into my world, those who taught me to get outside of my own little box and consider the needs around me, who encouraged me to think a little more (and not just swallow the party line), to slow down and look at the stars on a clear night or listen to the soft rain pattering, to find something nice to say to someone because maybe it’s the only nice thing that person hears all day.

I am the grateful student of those who taught these things, encouraged these things, modeled these things and much more. Their shining examples, their admirable character, left permanent impressions on me. I want to be like them when I grow up. They have countered and helped push away the prevalent me-first stand of so many others who also tried to leave marks.

They say you become like the company you keep. We keep company in lots of ways these days – not only in person but also through our computers and phones. Perhaps we should be more mindful of the marks we subject ourselves to and concentrate our people-time with those who are likely to leave good marks. Likewise, what about the marks we ourselves leave – now there’s a sobering thought…

Playing with Food: Onion Cream Pizza!

If you are making whole wheat bread for the first time (or, name it: potato pancakes, chicken piccata, broccoli salad, oatmeal cookies…), you are likely to follow the recipe to a T. You walk consciously through the steps: Do I have everything on the list? Oh dear, I don’t have that kind of pan. How small should I cut this up? Is this the right consistency? What do they mean by “firm”?

But if you cook or bake a thing frequently, after a while you don’t need the recipe anymore. The ingredients, quantities, sequence, timing, temperature, variances and all other factors associated with making it have pretty well lodged in your head. You know what it looks like when it’s done right, what it feels like, what it smells like. You know what will affect it adversely, what doesn’t matter and what might enhance it. When you do a thing often, you get a sense for it. That’s when you can play with it.

For example, I made potato pancakes on Friday night: shredded potatoes, flour, egg, salt and pepper (and ideally a little chopped onion and parsley) mixed up in a bowl and plopped in hot oil until brown on one side, then flipped and browned on the other. In this case

  1. I forgot the flour (helps bind it a bit, oops, but somehow these were fine).
  2. A small red onion spoke to me from the pantry like Dory with the sharks in Finding Nemo – “Pick me! Pick me!” I don’t always have red onion in the house and I think it’s nicer than white.
  3. I was not feeling quite energetic enough to make a salad as well, but my good sense tells me “green is important!” so I chopped up some spinach and added it to the potato pancake mixture.
  4. I didn’t want to use two pans but I had a bit too much mixture for normal size potato pancakes. You can’t tell so much from the photo, but these are fat and thick, which meant a lower flame and a longer cooking time to make sure all of the potato got cooked through.

with spinach.jpg

This recipe works well with sweet potatoes too. Hmm, how would half sweet potato and half white potato be? What about shallots instead of red onion? What if I added a bit of bacon or ham next time, cooked to crispy and chopped up fine?

The potato pancakes were a side dish to pork chops (though sometimes they are a meal in themselves). I took some applesauce out of the freezer (that I made last fall) because applesauce goes beautifully with potato pancakes and pork chops. I had some apples in the fridge this past week that needed to be used, so I had cut them up small, with skins on, and cooked them till soft. I call this “stewed apples” rather than applesauce, though the difference is technical. Anyway there was a little of this left (not enough for dinner) but the two mixed together became applesauce with a bit more texture than usual. Why not?

I like playing with food. You can play even if you are not the one preparing the dish. Let’s say you like salad and you like quinoa. You go to a restaurant and they have one with a combination of ingredients you would not have thought to put together. Mine this past week at Burton’s Grill  came with dried cranberries, finely julienned veggies, roasted beets, candied pecans, shredded cheddar and maple dijonnaise. You know I don’t eat nuts, so they left those off, and once, maybe ten years ago, I had a great quinoa salad with a lemon dressing. One of the other salads on Burton’s menu had a lemon vinaigrette, so I asked if they could use their lemon dressing on the quinoa salad for me. Sure, our server said. It was fabulous!

But prize this week for playing with food goes to last night’s pizza. I have a wonderful book called Pizza Napoletana!* I used it for what Claudia calls “inspirational value.” I would not ordinarily be drawn to a recipe called Pizza Boscaiola all’ Lombardi (Mushroom Pizza). Nor did the intro grab my attention: “In the fall, the forests of Italy are dotted with mushroom hunters. Porcini is on everyone’s mind. Other wild mushrooms, such as shiitakes or morels, may be substituted.”

I assure you, mushrooms are not on my mind in the fall or at any other time of year. They are a bit too earthy for my taste. Like my aversion to nuts, it would be easier to be able to say “sorry, I’m allergic.” I’m not. I just don’t like them. I avoid them routinely.

What caught my eye were two words in the ingredient list: heavy cream. In a pizza recipe??? Mmmm! Oh, yeah! Those two words jumped at me. They were all I needed.

recipe2 cropped_LI.jpg

I did not actually have heavy cream in the house, seldom do, but Saturday night’s Airbnb cottage guests (bless them) left an unopened pint of light cream in the fridge. That works, I said to myself. I glanced over the recipe, seemed pretty straightforward. It wants me to sauté the onion in olive oil, add the mushrooms, cook till tender, add the cream, stir in the parsley and thyme, spread on rolled-out dough, sprinkle with cheeses and bake. I didn’t do it that way.

First there was the mushroom problem. What about some other vegetable? Samuel said. Peppers! I had a red pepper. That works. See? My aversion to some foods comes in handy — it forces me to play 😊.

I cut up the equivalent of three medium onions and one red pepper, got them going in the pan with half a stick (4 Tablespoons) butter – yes, the recipe said olive oil, which normally I love, but dairy was calling my name, so butter won that toss-up. There is nothing quite like the smell of onion sautéing in butter.

saute2.jpg

Then I thought, hey, what about garlic? I finely diced three cloves and added them to the onion and pepper.

Not having heavy cream, which would be heavy enough in and of itself, I decided to make a roux, or white sauce, to ensure a degree of thickness that wouldn’t be runny on a pizza. When the onions were soft and transparent, I added half a cup of flour (in retrospect, this might have been slightly too much) and then the pint of light cream a little at a time. Samuel ground some fresh pepper into it.

creamed onion.jpg

In the meantime I rolled out the perfect dough that Samuel had made (there is something about his dough that’s different than mine – better! – and I will figure it out someday!). Having used the recipe only for inspiration, in other words not referring to it as often as perhaps I should have, I then spread the creamy onion mixture on the dough and sprinkled salt and the cheeses on top.

I had parmesan cheese, but not the best kind, and this pizza was going to be good so I wanted to go with superior products. It came into my mind that I had had such luck with the asiago cheese on my pizza last week. So for cheeses I shredded a pound of mozzarella and a chunk of asiago that takes up as much space in your grip as a tennis ball, about 3x2x2”.

After the cheeses were on, I remembered (oops again) there were herbs called for as well. They should have been mixed into the onions and cream. Ah, well, on top they go.

uncooked.jpg

I cannot imagine that mixing the herbs in would have made this pizza better because it was already quite amazing. But I’ll play around with this idea again – get the good, imported Parmigiano-Reggiano cheese maybe, or in the summertime use fresh parsley and thyme out of the garden, or see how heavy cream instead of a thickened light cream compares. In any case, this one’s a keeper!

cooked.jpg

________________

Pizza Napoletana! By Pamela Shelton Johns, Ten Speed Press, Berkeley, California, 1999.

Chocolate Chip Walnut Biscotti

Most people have an aversion to certain foods. They don’t like bananas, or are allergic to garlic, or can’t stand cilantro. I don’t do nuts of any kind, and I don’t drink coffee. This biscotti recipe contains both nuts and coffee, a double whammy for me, so I cannot tell you that they are good. But you could believe me when I tell you that everyone who has tried them has loved them, and then give ‘em a go yourself.

I doubled the recipe* because I like to have enough to give some away. Okay, I give all these away. My friend Melba and her husband Brian had sad news recently about their beloved dog, and I hope these biscotti will help console their hurting hearts. If you know someone who could use a bit of cheer, consider a small gift of something homemade. We cannot change the circumstance, but we can remind people we love that they have been on our hearts. Food conveys love, care, warmth.

on plate.jpg

It’s an easy dough to put together, but I don’t know why they set up recipes the way they do. If they want you to cream the butter with the sugars and then add the flour and other dry ingredients, why don’t they tell you that? In that order? Why do they tell you first of all to combine the dry ingredients and then set them aside? Why would I want to wash two bowls when I can wash just one?

recipe cropped.jpg

I suggest: combine the butter and sugars, add the eggs, then the dry ingredients (I do not sift together these together, I just put them in), then the chips and nuts. This recipe says to use an electric mixer. You know I love my new mixer, and certainly you are welcome to use yours, but this is one you could manage with a good spoon. Your call.

The dough is like a cookie dough, pretty stiff, easily pulling away from the side of the bowl.

dough.jpg

I did not have instant espresso powder, whatever that is. But my former barista son Samuel tells me that ground coffee is the same thing, that the difference between coffee and espresso is in the brewing method and the brewing method only. Well, I hope so because he was sequestered while I was making these, solving yet another perplexing coding problem, and I had some ground Folger’s in the fridge, so I substituted that for the instant espresso powder.

The walnuts are another thing. I had bought them already chopped but have learned from making this recipe in the past that if they are too big, the loaves are harder to slice when the time comes for that, so I chopped them smaller. For this purpose may I present the best chopper I know (Kwik-Kut Mfg. Co, Mohawk, NY). I’ve had it for decades but I know they still sell them. I got some for gifts at Yoder’s this past year. (Great for egg salad too, if you are into that.)

chopper.jpg

I put the 2 cups of nuts (remember I doubled the recipe) into my four-cup glass measure and chopped them right in there (again why measure in one cup and chop in another – that would be two things to wash instead of one). I didn’t get carried away and I didn’t go for a specific size piece. I just chopped till I got tired of chopping.

chopping nuts.jpg

I suggest using mini chocolate chips instead of the regular-size morsels (again for the ease-of-slicing reason), but I didn’t have enough (having used half the bag in the oatmeal cookies I made yesterday). So I used some regulars too, and tried chopping them into what I needed, the same as I chopped the nuts. It was a little harder but I reduced their size a bit. Using all mini chips would have been better. Get the minis.

all ingredients.jpg

Once all of the ingredients are combined, you can use your hands and form one solid ball of dough. I cut this into four pieces so that I’d have equal-size loaves.

divided dough.jpg

I formed these quarters and put them on my pans, hoping they wouldn’t spread too much. They look like little meatloaves to me!

unbaked loaves.jpg

I found that it took longer to bake than the 25 minutes at (fully pre-heated) 325F for these loaves to be firm to the touch, more like 35 minutes. I gave them their prescribed five-minute rest period, then used the right knife for slicing biscotti to slice them. Between the nuts and the chips, and the loaves still being pretty hot after the five minutes, it was not as smooth going through as perhaps it might be (you see a few breaks), but I managed to slice them, put them cut side down and bake again. This too took longer, more like 15 minutes per side.

sliced2.jpg

Who knows, maybe I sliced them thicker, or maybe my oven is on the cooler side and I should have upped the heat. Whatever the case, they looked great in the end, even if I cannot tell you they tasted great. Samuel gave them the thumbs-up, and he doesn’t even like sweet things generally.

batch.jpg

Doubling the recipe made quite a few; I count about 30. These keep well, ship well, dunk in coffee well 😊 Enjoy!!


*recipe from my William-Sonoma Cookies and Biscotti cookbook, Time-Life Custom Publishing, 1993

Water, Yeast, Flour, Salt

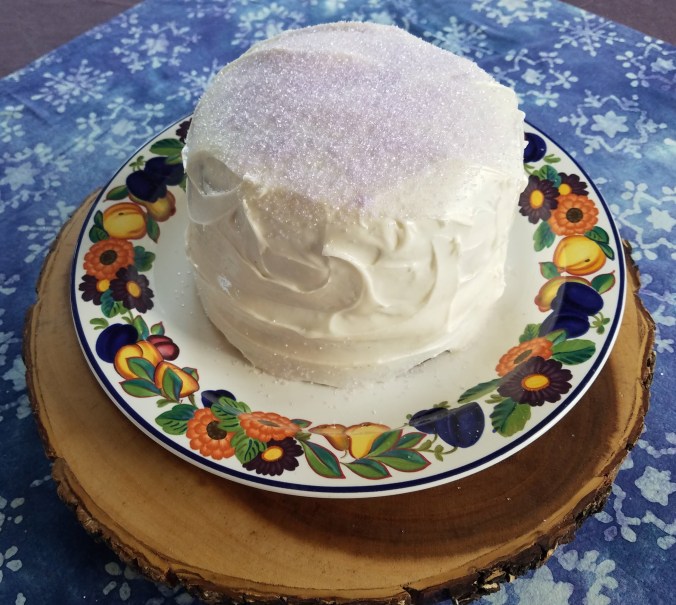
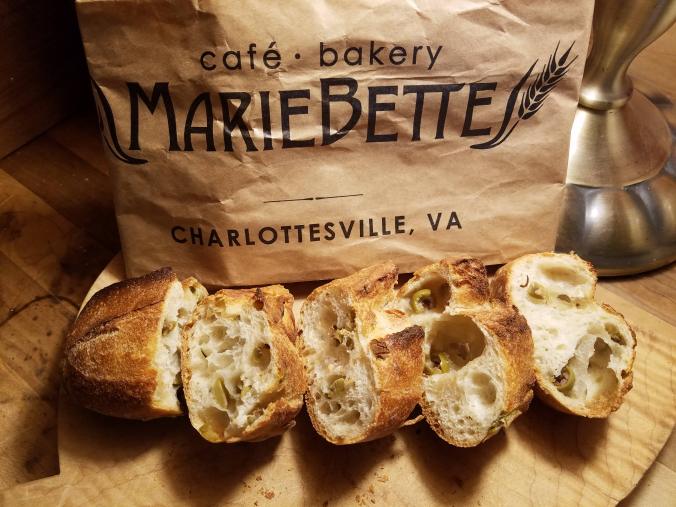
When I am out and about and find myself in a shop with freshly baked breads, I am sorely tempted every time. There’s something downright magical about baked things for me. They go from a gooey, sticky mess in a bowl to a delicious, not-dry but not-sticky-anymore, holding-its-shape wonder that always begs for my attention (and my purchase!). I often give in. Yesterday at MarieBette in Charlottesville, I was mesmerized by the olive baguettes, apple galettes and salted pretzel croissants (!). Heavenly, all of it! A baguette and a croissant came home with me. You don’t get texture like this everywhere. Oh, and the taste, the consistency, the crust…!

MarieBette.jpg

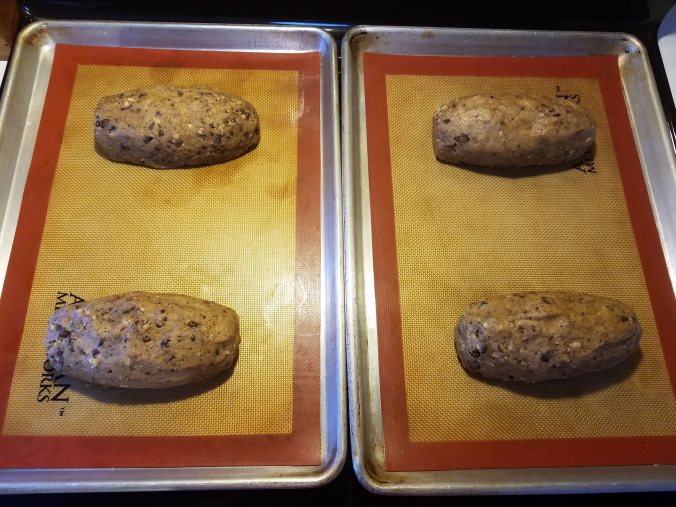
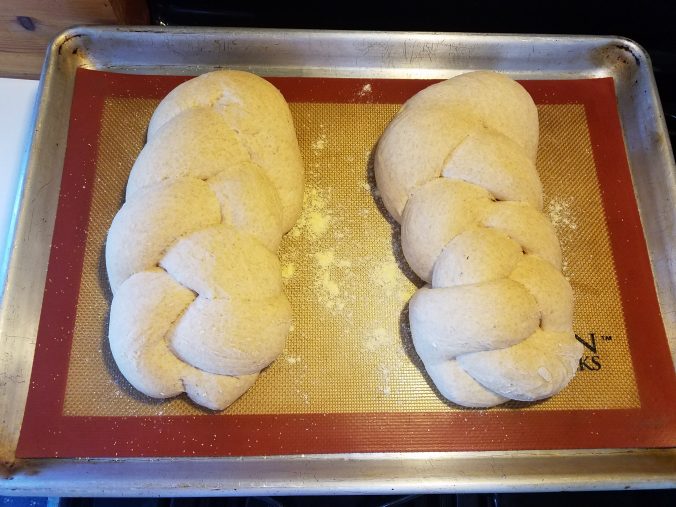
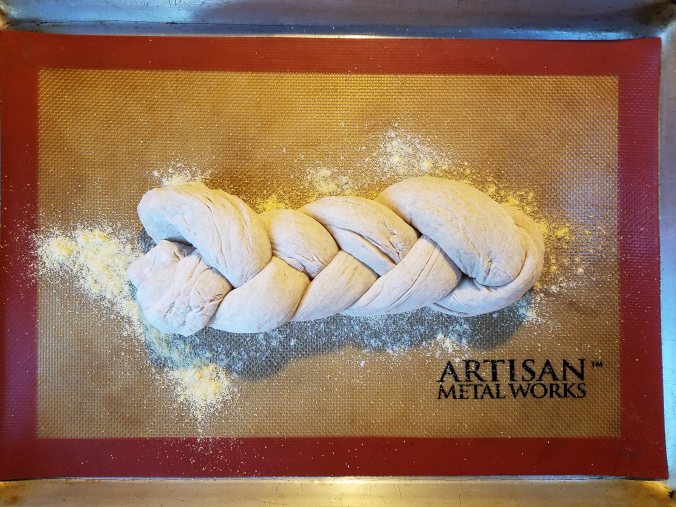
One day last week I woke up saying to myself It’s not that hard. Water, yeast, flour, salt. Other ingredients optional. So I got out a bowl and started in. That day I made rolls instead of bread; they did not last long. On Monday of this week I got the bug again and made two braids. This is just before baking them.

1.28.17.jpg

They came out delicious! I will not say my bread is on par with MarieBette’s, but it is respectable and yummy. Dare I ask for more?

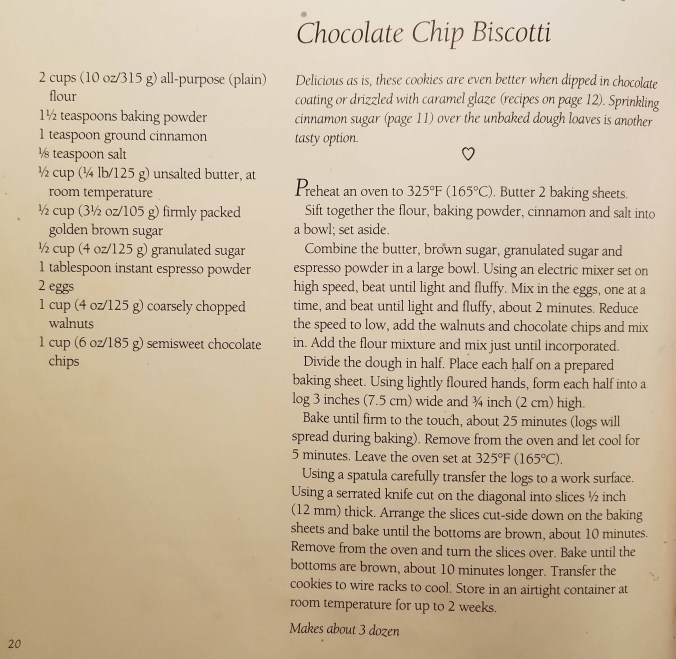
Then Fred said, “I find baking and bread making to be a bit more challenging than some other cooking. It’s so much more than looking at a recipe and measuring accurately. The technique and order of adding ingredients is critical to the outcome. I’m still learning how to properly knead bread dough and what it should look like when it’s ready.”

Besides Fred recognizing that some things are not as simple as others and that skill and experience do come into play and affect the outcome, besides his very admirable acknowledgement that he has things to learn (don’t we all!), his statements are so true! Technique and order are important – e.g. if you add the salt too soon you will kill the yeast – and properly kneading dough is a thing to practice.

Yesterday as I made another batch, I thought about the challenge of giving instructions in written form. To knead bread, you push the wad of dough away from yourself with the heel(s) of your hand(s) and pull it back with your whole hand(s) in a grasp – forward and back, forward and back – all while moving it around on your floured surface in such a way as to pick up (and work into the dough) the flour that is on the surface. I am not sure if that makes sense in words, but it’s what I do.

Let’s start at the beginning. Water, yeast, flour and salt are the main ingredients, but recipes often call for other things. Milk or butter added in will make the dough (and subsequent bread) softer. Eggs will make it richer. Sugar will make it sweeter. Whole grains will make a different texture.

Yesterday I decided on a simple wheat dough and planned to make half of it a loaf of bread and half of it the base for a pizza. Rule of thumb: for every cup of liquid that you start with, you get about a loaf of bread or one pizza crust, so I needed two cups of liquid. I like my wheat dough a little softer, so I put about 2/3 cup on milk in my glass two-cup measure, and the rest water.

There is nothing magical about this proportion (it could as easily have been half milk and half water); it’s just what I did. The fact is that the more butterfat in the dough, the softer it will be.

Making bread has been happening for a very long time, way before exact measurements. But I’ll do my best. In the microwave this water/milk went for one minute 45 seconds, which showed just over 100F on my thermometer, which based on my results clearly was enough. The ideal temp is between 105 and 110. Yeast can multiply at 95F but a little warmer is needed to dissolve the yeast and help it “proof” or become active.

Proof the yeast? Watch. Here is my bowl of warmed water/milk combined with 2 tablespoons yeast and two cups wheat flour. In about 15 minutes, the mixture has grown. See the level in the bowl? How high up on the spoon it comes?

This slideshow requires JavaScript.

I love this part. I love how it grows! Look at that – it’s just three ingredients, and it grows!

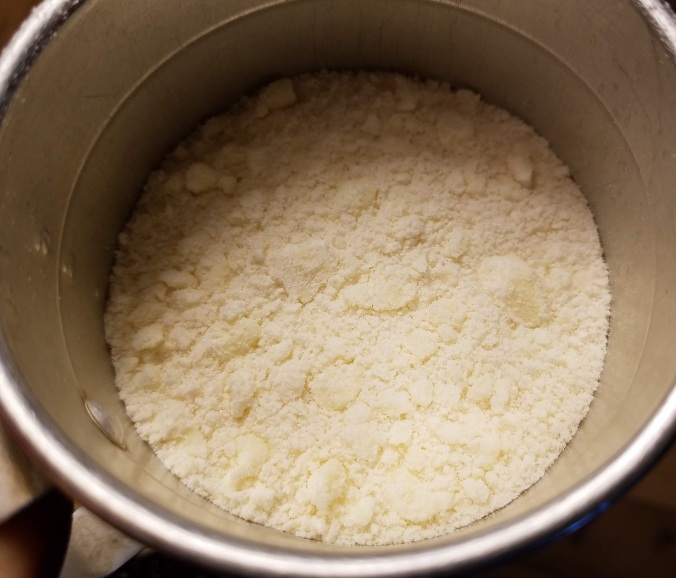
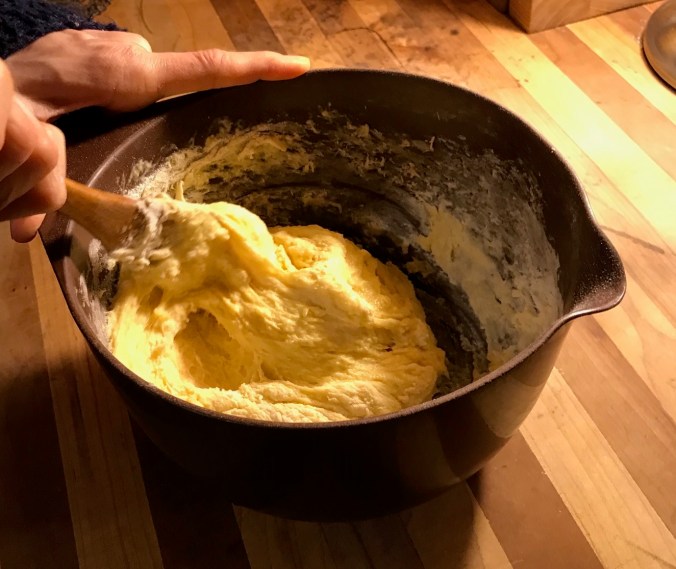
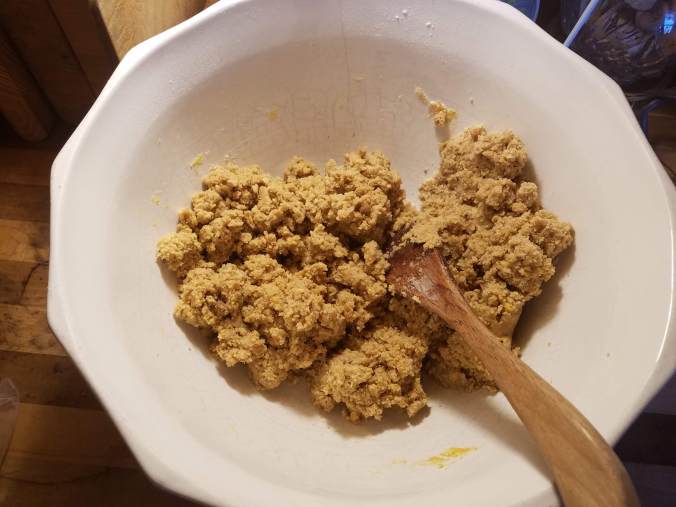
After I admire it and smile, I keep going. I’ve made the mistake of adding the salt too soon (and the dough won’t rise because the yeast is dead) and forgetting the salt altogether (and the dough/bread is seriously lacking in flavor), so I try to time the salt about midway through adding the rest of the flour. I added two cups of regular flour (by which I mean unbleached white flour) to my proofed mixture,

bowl2.jpg

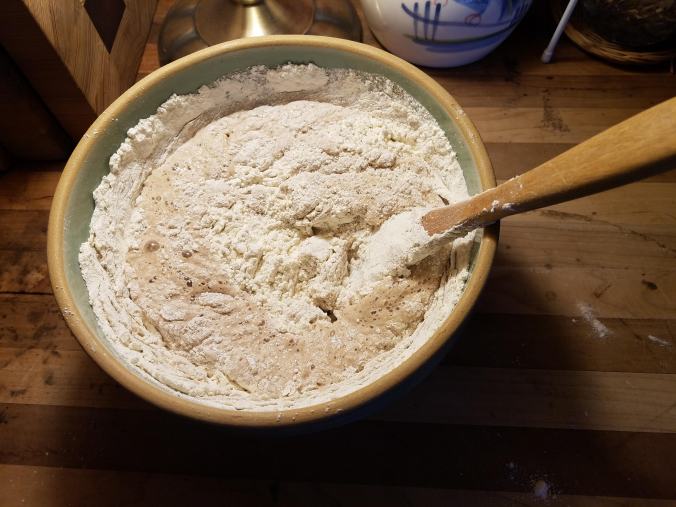
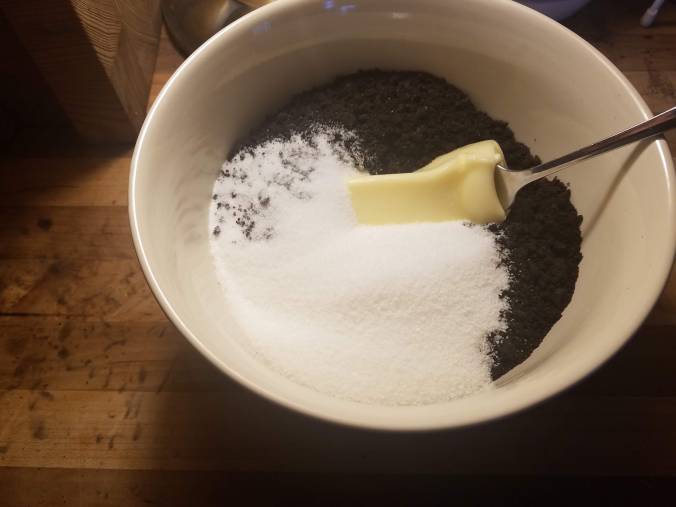
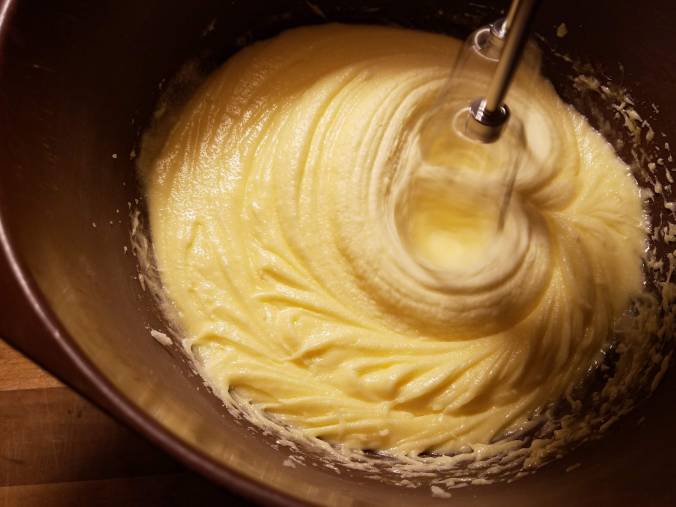
which makes a gooky mess that’s not yet too hard to stir (though make sure you have a strong spoon). Then I added 1 ½ teaspoons salt (measured in my hand, so again, approximately), which is (another rule of thumb for me) about ¾ teaspoon per cup of liquid or per loaf. With four cups of flour total stirred into the water/milk/yeast proof, it begins to pull from the side of the bowl.

bowl3.jpg

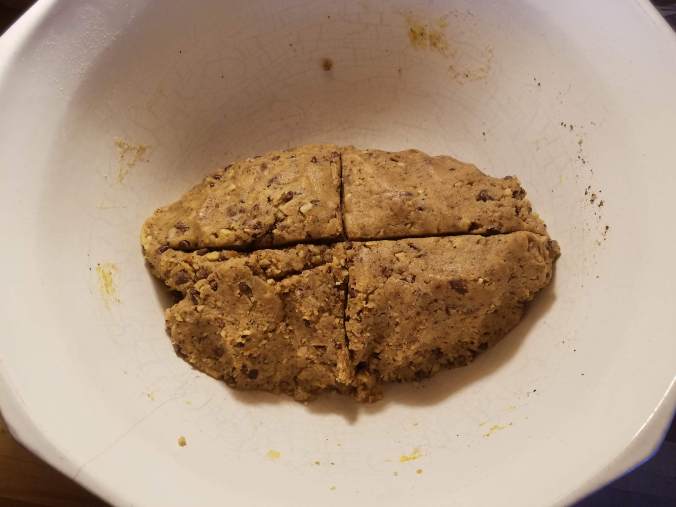
Then another cup of flour (that’s five cups total for the two cups of liquid), till it looks something like this.

bowl4.jpg

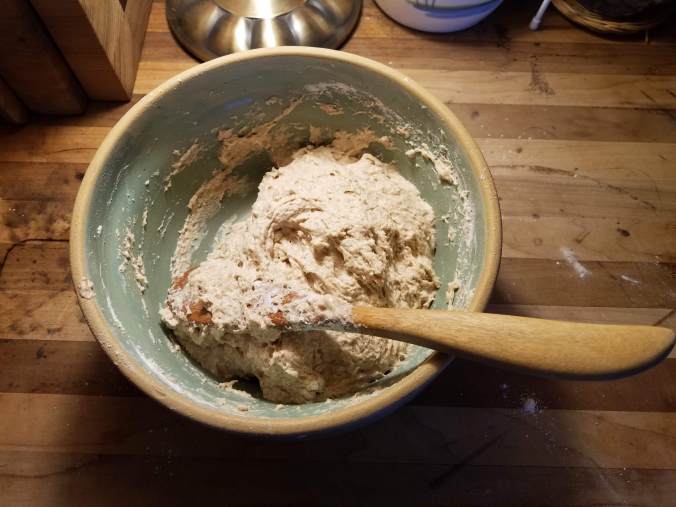
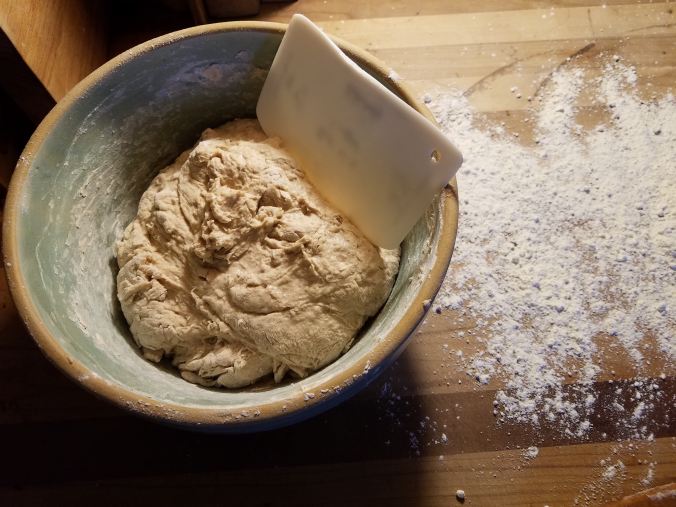
That’s when you “turn it out” onto a floured surface. I don’t like to waste any bits of the dough that have stuck to the bowl, plus I want to make clean-up as easy as possible, so I use this great scraper.

bowl5.jpg

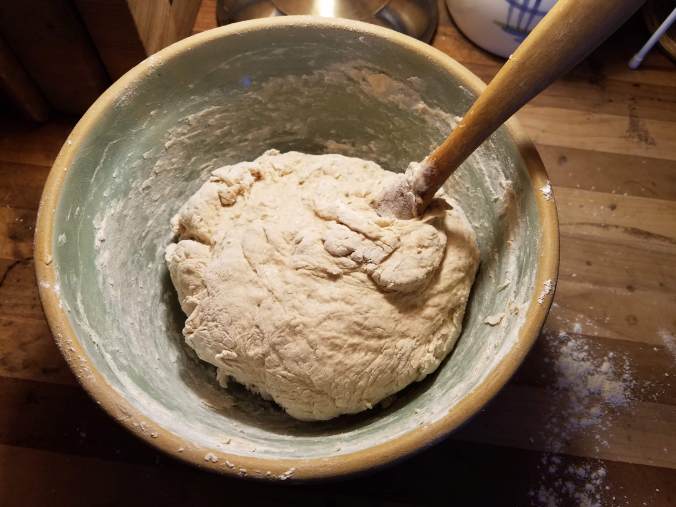
Make sure your hands are clean, and it’s best to take off rings for this next part. It’s easier to watch someone knead dough than try to follow written instructions. This video might help. Keep kneading until your dough is smooth and elastic. I added about another half cup of flour to the dough before I felt it was ready. The ten minutes it takes, the exertion of energy it takes, is good for you! Using your body maintains its good health in so many ways and makes you hungry for that slice of wonderful bread that will result from your labor.smooth and elastic.jpg

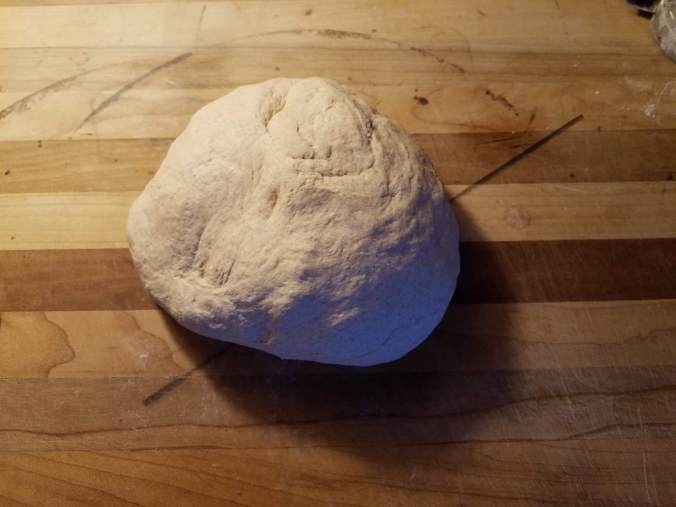
The next part is again magic, similar to the proofing of the yeast earlier. Once the dough is smooth and elastic, you let it rest. You put a little flour under it and on it, like this, then cover it with a towel and wait. All it would really need before the next stage is about 20 minutes, but a full rise is okay too. These photos were taken at 15 minutes, at 45 minutes and at one hour and 15 minutes. Look at how it grows!

This slideshow requires JavaScript.

What a transformation! The next set of photos show the dough at the beginning and at the end, followed by one of the most satisfying things known to humankind – punching it down!

Before rising, after rising, punch down, before rising, after rising, punch down…

This slideshow requires JavaScript.

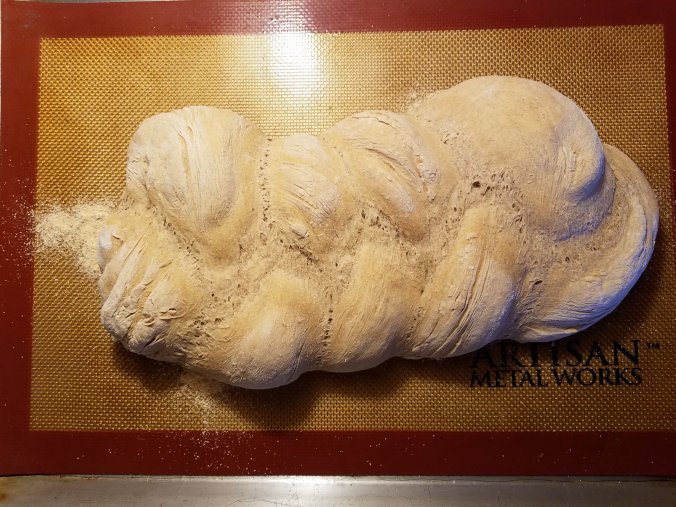
Now you make the shape you want for your bread. A standard (greased) loaf pan works fine, or you can make rolls or a braid and put it down on a silicone mat sprinkled with corn meal.

braid not yet baked.jpg

This needs to rise again in a warm (not hot) place. I turned the oven on for one minute, then turned it off, then put the pan in. This is guessing (as to temperature), I know, but it works. Once it has risen (about doubled in bulk), bake it at 375F until it’s light brown and “sounds hollow” when you tap on it.

braid baked.jpg

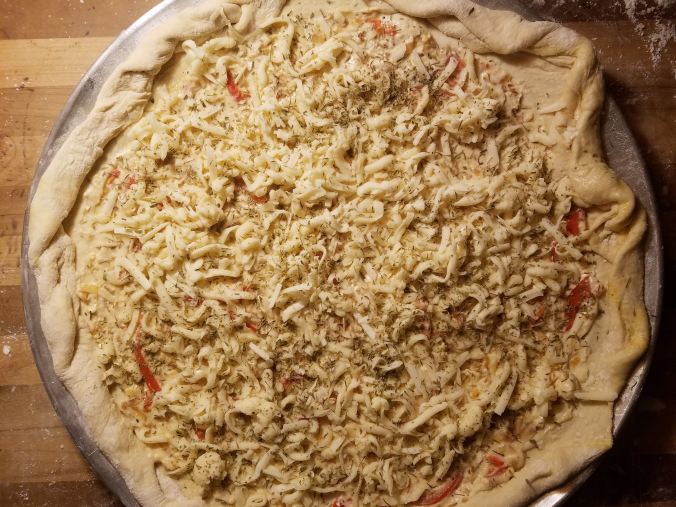
The other half of my dough I had put in a greased bowl (as they show in the video), sprinkled with flour, covered with a towel and put in the fridge. I knew I didn’t want pizza till later.

pizza later.jpg

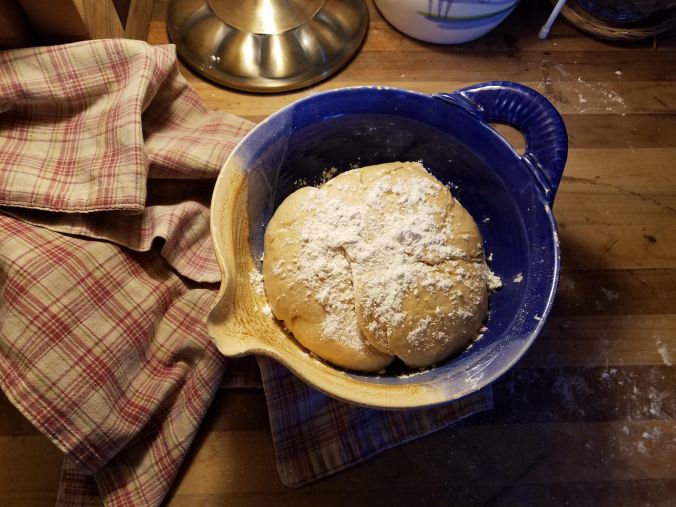
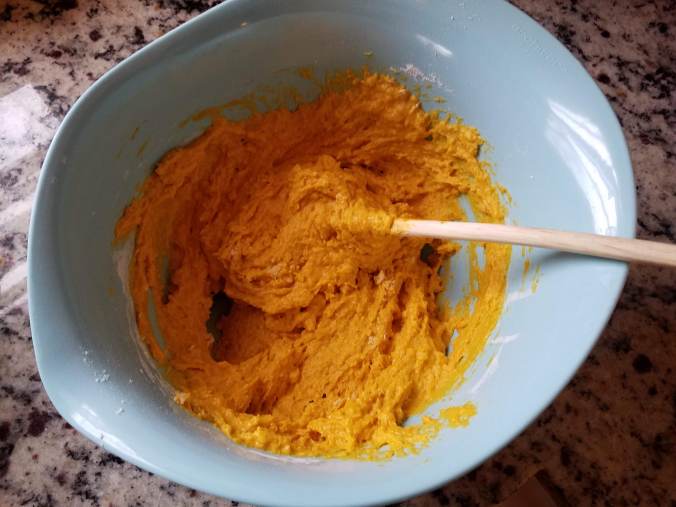
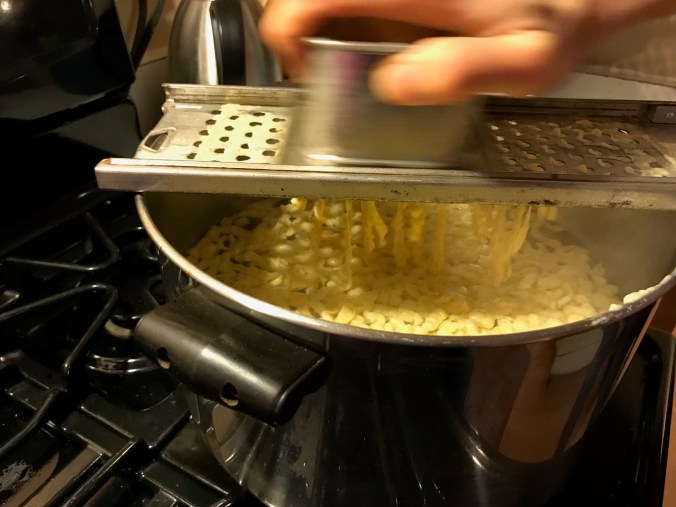
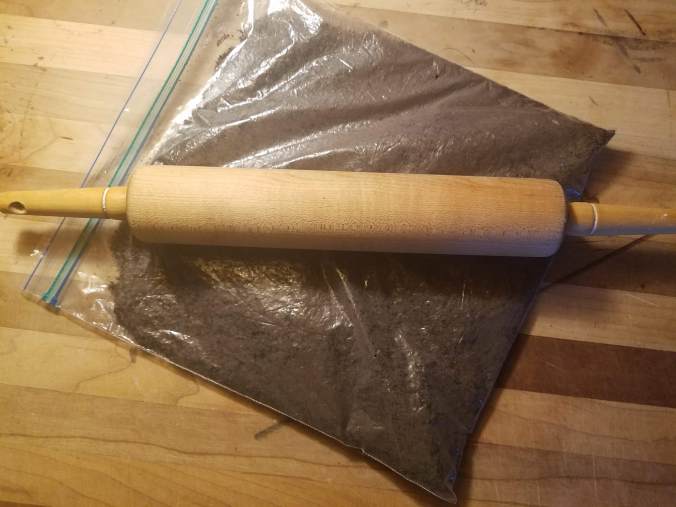
Later, I took the bowl out of the fridge and let it sit half an hour before rolling the dough out to fit my (oiled with olive oil) pizza pan. I then did a new thing! I sprinkled olive oil on top of the rolled-out dough, spread it around and sprinkled it with salt and pepper. In my cast iron pan I sautéed three medium size onions till they were softened (but not mush), set that aside. I grated three chunks of asiago cheese, each of which was a chunk as big as I could fit my fingers around, and mixed that in a bowl with some chopped spinach, 10 or so slices of hard salami cut up, and a red pepper thinly sliced. I dumped the cheese mixture on the oiled dough, spread it out, then scattered the onions on top. I baked it at 425F till it looked melty on top, then slid it off the pan to crisp the bottom. Oh yum!

pizza.jpg

Water, Yeast, Flour, Salt — the base for uncountable varieties of goodness!!


A Pumpkin Custard Irregularity

Yesterday a can of pumpkin called my name. I know January isn’t when you usually think of pumpkin. Most canned pumpkin sold in the US sells in the fall, not in the winter, spring or summer.* Still, I saw it sitting there in my pantry when I was looking for the wheat flour and it called my name. Pumpkin is really good for you. It’s loaded with Vitamins A and C, and a cup of it has more potassium than a banana. Plus, I was hungry, and a great recipe for pumpkin custard popped into my head. It’s from my friend Bobbe (to whom I apologize if I have abominated her recipe).

Pumpkin custard is basically pumpkin pie without the crust. Maybe not quite as rich, and you have to be willing to eat custard without crust. Granted, a pie crust is the perfect, flakey, slightly crispy compliment to the smooth, velvety custard/pie. The combo is worth the trouble…usually. But not always. Sometimes I don’t want to make a crust, or I don’t have time. Sometimes I just want the creamy part – a quick and easy mixing of ingredients and into a baking dish it goes.

Yesterday I had another idea, a new idea. I opened the can of pumpkin, then found the molasses and poured a bit in. I didn’t remember that molasses isn’t in my pumpkin custard recipe – it’s in my pumpkin pie recipe – oh well! (This is what happens when you start putting stuff in the bowl before you open the cookbook.) Plus I didn’t actually measure the molasses, so never mind about it unless you want to put a tablespoon or two in there; it won’t affect anything except to make the flavor richer. I got the brown sugar out, and then the eggs and all the other ingredients – all while contemplating a strange addition. It was breakfast-time, okay, so I can be forgiven for this I think. How about some oatmeal?

Oatmeal?? Oatmeal!! I took down my beauteous old tin (isn’t it beauteous?)

quaker oats tin cropped.jpg

and (definitely did not measure this) added two handfuls of the old-fashioned oats contained within – what I could hold in one hand twice. I stirred it all up and poured it into the 8×8” cast iron pan I had had heating up in a 375F oven with a pat of butter in it (the recipe says 350, but 375 worked just fine). I cooked it till it was set, wondering all the while if I was crazy. It’ll just be pumpkin custard with a bit of texture to it, I told myself. It takes a while for this to bake, and I was doubting myself considerably the whole time, I won’t lie. But it wasn’t half bad! Actually I was quite pleased with not-overly-sweet pumpkin flavor and the nice oatmealy texture!

pumpkin custard.jpg

This photo doesn’t come close to doing it justice, but really, if you want a twist on pumpkin custard that works for breakfast, this is worth a go! You could eat it hot, warm or cold, but I think warm is best. I was pretty excited about it, and mentioned it to Samuel when he came out from his coding-cave. He said, “You did what?!” I told him again and he said, “Mom, that’s like putting peas in bread! It just doesn’t go together!”

I said, “Frozen peas or canned peas?”

“It doesn’t matter,” he said. “Either way, both are food combinations that don’t make sense.”

I am not ready to put peas in my bread dough and see what happens any time soon. But oats in pumpkin custard isn’t that weird, is it? Let’s just call it irregular. A long time ago I read a book called Irregular People* which was about exactly what you think it would be about (and can’t we all think of someone who fits that word?!). Irregular is a very cool word anyway, even if it does, for me, conjure up images of strange and/or difficult people. I’ve decided that it applies nicely to my custard-oatmeal combination, if I may say so.

In case you are inclined to think out of the custard box and the oatmeal box, so to speak, and in case you have a can of pumpkin in your pantry that you should use before next fall, you might want to give this a whirl. Here’s the recipe from my cookbook, typed out below in case the handwriting is hard to read. With or without some oats thrown in for a little texture, enjoy!

recipe cropped.jpg

Pumpkin Custard

Preheat oven to 350F.
Combine:
1 ½ cups cooked, strained pumpkin (one 15oz/425g can)
2/3 cup brown sugar (I did not add this much, but did add some molasses)
3 beaten eggs (I did not beat mine before adding them in)
1 ½ cups scalded milk (I added it cold and it worked fine)
1 Tablespoon cornstarch (I forgot this)
1 teaspoon cinnamon (yes)
½ teaspoon ginger (yes)
¼ teaspoon each ground cloves and nutmeg (I did not add these)
(I added two handfuls old-fashioned oats)

Pour in buttered baking dish (don’t you love how the recipe assumes you know what size dish to use? I used my 8×8” cast iron)
Bake 45 minutes or till set.


*According to the Agricultural Marketing Resource Center, Libby’s (owned by Nestle), with 90% of the US market for canned pumpkin, sells 90% of it from October through January.

** Irregular People by Joyce Landorf Heatherley, 1982

Chocolate Cheesecake and Degrees of Fabulousness

The tradition in our family is that on your birthday you get the kind of cake you want. It’s telling that the last two cakes I’ve made my children – for Marie in Boise in September and for Lincoln this week (to bring to Vermont) – have been chocolate cheesecake. This is one of those that I’ve made quite often over the years. It always cracks, but that never matters! It’s totally fabulous. There are no words to describe its fabulousness.

You start with a box of Nabisco chocolate wafers crushed up fine. These are dark, thin and crisp. They crush into fine crumbs nicely. I used to use my food processor, which works great and creates fine, even crumbs, but then I was in a hurry one time and didn’t want to bother taking the machine out, setting it up, using it for one minute and then having to clean, dry and put it all away again. So I tried using a gallon-size ziplock bag and a rolling pin, which requires more uumph but does the trick, and have been doing that ever since. Plus I always figure that if I work a little harder to make the cake, if I exert more energy, burn more calories, I have less to worry about when the time comes for eating it. This may be faulty logic, but it has served me well 😊

crumbs.jpg

One package of cookies is 9 oz (255g) which crush to about 2 cups (500ml), a little more maybe depending on the size of your crumbs.

crumbs in cup (2).jpg

The cookie crumbs get mixed with ½ cup sugar and 5-6 tablespoons of butter. It’s better if the butter is soft to begin with, but if it’s not, you can manage. I am not being exact on the amount of butter because it doesn’t matter. It works just fine with 5 TB, but 6 makes the mixture a bit more pressable in the pan. A fork works to mix it up, but if you have a pastry blender, that’s a bit better.

crumbs in bowl unmixed.jpg

Mixing it up means evenly distributing the sugar and the butter. It ends up looking like this.

crumbs in bowl mixed.jpg

I’ve made this recipe many times and found it makes a very thick cake, so I took to making two, one small and one large. (Now that I think of it, that’s probably why I started using the whole package of cookies — see recipe below.)  I don’t think Lincoln will object to having two birthday cakes! I used two springform pans, one 26cm (10.5”) and one 17cm (6.5”). You could use any combo that adds up to about the same size, or one very large pan and have a thicker cake.

Into the pans go the crumbs. You press them out with your fingers or the back of a spoon until they are not too loose. You’ll be plopping thick cake batter on top of this.

crumbs in pan.jpg

Oh, the recipe. I copied this years ago out of a book called Great American Cakes, which I cannot find. Looking at the recipe. seems I did make some changes! I use the whole package of chocolate wafers and correspondingly a bit more butter, but I stayed with the ½ cup sugar. The batter part, I promise you, I always make exactly as the recipe says (well, almost, we’ll get to that). Trust me, it’s all good!

recipe (2).jpg

(In case this is hard to read, I’ve typed it out below.)

I did two things differently: 1. After I beat the eggs into the cream cheese mixture (or watched as my beast of an electric stand mixer beat it in), after I added the vanilla, sour cream and chocolate and watched said mixer combine all these ingredients, I turned up the speed. I’m blaming this on Aquaman! Yes! On account of it having been an awesome movie, Samuel and I subsequently watched Captain America and The Avengers, all very (goes without saying) action-packed and fast-moving. Could there be something changing in my brain – hey, speed can be fun! – that I am transferring to cake-making?? It made a beautiful fluffy batter, I can tell you that. (You may note my restraint – I am not going to go on and on about the swirls!)

batter.jpg

So I did not allow the mixer to simply “stir in” the vanilla, sour cream and chocolate. I let the machine beat it silly! This produces air in the batter, which may or may not be a thing I decide is a good, permanent change. This is how recipes evolve.

A thing to know is that this cake cracks. I always have followed the recipe exactly regarding the very slow cooling process, which is to help prevent cracking, but it always cracks anyway. When I say crack, I mean crack. It goes from being smoothed out in the pan (pans in this case)…

batter in pans.jpg

…to looking like the Grand Canyon on steroids.

cracks.jpg

But it doesn’t matter! You take a can of cherry pie filling, spread it on top and watch all signs of cracks disappear! No one is the wiser and it tastes heavenly! Just don’t forget the cherry pie filling (although you could use any flavor of pie filling that you deem appropriate to go with chocolate cheesecake).

About which I must tell you my second change. This cake is for Lincoln, who in the past always left the cherries on his plate. He liked the sweet, pudding-like, thickened cherry juice just fine, but the cherries themselves he couldn’t eat. Last time I made this for him, I tried using (what was then new and I was playing around) my immersion blender to finely chop up the cherries and blend them with the pudding-like part. He loved it! So that’s what I do now.

with cherries.jpg

That’s the thing with recipes, with life! You can do something this way or that way for years (I’ve been making this recipe for at least 20, I’d say) and one day get a brainstorm that turns out to be a much better way. I am unable to firmly say yes-absolutely-go-for-it! regarding the late-stage furious whipping of the batter because with the whipping it’s fabulous and without the whipping it’s fabulous, and who can measure degrees of fabulous-ness?? But on the changing of normal cherry pie filling (with whole cherries in it) to a thick, fruity topping of even consistency – that’s a keeper!

Chocolate Cheesecake with Cherry Topping

2/3 package chocolate wafer cookies, crushed
½ stick (1/4 cup) butter
½ cup sugar
———————————————————
2 Tbsp unsweetened cocoa
1 Tbsp flour
½ tsp salt
½ cup sugar
½ cup light brown sugar
1 ½ lbs (3 eight-ounce packages) cream cheese, softened
5 eggs
2 tsp vanilla
1 cup sour cream
8 oz. (2/3 of 12-oz package) semisweet chocolate morsels, melted (4 mins on power 4 in microwave)
1 can cherry pie filling (for topping)

  1. Combine crushed cookies, ½ cup sugar and butter for crust. Press into bottom and sides of springform pan. (I cover just the bottom.)
  2. In large bowl (I use my large stand mixer bowl) beat cream cheese with electric mixer. Add cocoa powder, sugars, salt and flour; beat till smooth. Add eggs, one at a time, beating after each. Stir in vanilla, sour cream and melted chocolate. Pour (plop carefully) into crust.
  3. Bake in preheated 450-degree oven for 15 minutes. Reduce oven temperature to 300 degrees and continue baking. Turn off heat but leave cheesecake in oven for one more hour. After that, still leaving cake in oven, prop oven door open (very slow cooling), another hour. (Remove from oven, transfer to plates by sliding a knife around the edge of the springform pan, opening the release of that pan and carefully removing side part, sliding a wide, strong spatula carefully under cake and easing it onto a plate.)
  4. Spread cherry pie filling on top (put in blender or use immersion blender first if you want to chop up the cherries.) Cool rest of the way in fridge.

The Icing on the Cake

I don’t mean Icing on the Cake in the figurative sense. You know, the way people say Oh that’s the icing on the cake when they mean the best part of an already good situation, something added that makes a thing better, an enhancement that you don’t actually need but takes the thing up a notch. Such as: My trip was already perfect in every way. The beautiful weather was just icing on the cake.

Notice that the phrase is not, generally, the frosting on the cake. There are exceptions of course, but the idiom that slips off the tongue for most people is the icing on the cake. The difference between icing and frosting is at the kindergarten level of understanding for pastry chefs and aficionados, but I daresay most people would be hard-pressed to articulate their particularities. That might be because the similarities are more striking. They both are 1. Sweet, 2. Spreadable, 3. Useful for enhancing/decorating/topping a cake or cupcakes.

Giovanna Zavell of Drake University begs to differ. She says they although they are commonly confused, they are in fact are “very different” and each have “their own personality.” Icing is thinner, glossier and gets a harder surface after it sets, as when you get eight inches of snow followed by a 40-degree day (so that the upper half inch or so melts) followed by a 10-degree day which makes that melted part form a crust on the surface that cracks as you walk through it. Icing is also called a glaze.

Frosting has more cream/butter, is fluffier and holds its shape. It is also called buttercream. You can spread it with a knife or you can squeeze it out of a pastry bag. Zavell says, “If you want my opinion, choose frosting. Always go with frosting.” But when it comes to food, there is really only one hard and fast “Always go with…” and we all know what that is. Always go with chocolate is just so obvious once you have tasted vanilla ice cream and then chocolate ice cream (I mean, seriously, who can argue with that?).

Now that we’re hopefully clear on icing vs. frosting (you will never mix them up again, right?), you will see that I am not focusing today on icing (though it’s what slipped out of my mind for a title (see how those idioms plant themselves deep in our brains and just spill out!), but rather on frosting. I ended up making two chocolate cakes recently, one for Sandy and one for John. On your birthday around here, you get the kind of cake you want, and both of them asked for chocolate, just sayin’!!

They wanted two different frostings though. Sandy, bless him, wanted chocolate. I know I will disappoint those who need/want exact instructions, but I was in a hurry that day and on autopilot. I mixed (with my new, handy-dandy electric mixer) half a stick of softened butter with some confectioner’s sugar (a.k.a. powdered sugar) (maybe two cups?), a few drops of vanilla, and enough milk (a teaspoon, two? three?) — oh and a couple heaping tablespoons of cocoa! — till it looked like this…

frosting needing more sugar.jpg

…at which point I said to myself No, that’s too wet and added more sugar…

frosting with more sugar.jpg

…to make the right consistency. By right consistency, I mean it is not dripping from the beaters, nor is it so stiff that you need to be Hercules to scrape it out of the bowl and spread it on the cake.

Sandy did not want further decoration on his cake – no silly sprinkles, sadly no coconut and thank God no crushed nuts of any kind. So his cake looked simple and tasted yummy. You can’t go wrong with chocolate + chocolate.

finished cropped.jpg

John, a few days later, wanted cream cheese frosting. For this (since I had better be a bit more specific), I checked with Fanny Farmer.

recipe cropped.jpg

I never put egg white in a frosting before! But hey, Fanny is reliable, and I must say, there was a nice fluffiness to this frosting when it was done. My mixer was wonderful again (what did I do without it??) and gives me the opportunity to show what I mean by drippy.

not enough sugar

This is what it looks like if you have not yet added enough sugar. It drips from the beaters and doesn’t hold the the beautiful shape of the beater swirls in the bowl. With enough sugar, it stays where it lands on the beaters, and the swirls hold their shape in the bowl. Gotta love those swirls!

not dripping


To frost the cake, first put a bit of frosting on the plate like this.

frosting on plate


That way, when you put your first layer of cake on the plate, it doesn’t tend to slide around as much. By the way, frosting a frozen cake is easier than frosting a non-frozen cake. So if you have time to plastic-wrap those layers and put them in the freezer for a while before the frosting stage, do that.

Frost the top of the first layer. Use a non-serrated knife if you want a smoother surface. Note: This does not have to look perfect. It’s going to get covered with the second layer.

frost middle


Add the second layer and frost the sides before the top. Note: This does not have to look perfect. It’s a homemade cake. Imperfections are part of the appeal.

sides first


When you are finished, defy expectations (John didn’t specify further decoration either) and add some prettiness such as colored sugar. There is already so much sugar in this – what’s a little more? It doesn’t change the flavor (or irritate anyone who doesn’t eat nuts and then could not enjoy this cake). I happened to have purple sugar on hand, which is a little more festive than it being plain, but not over-the-top. I hope he approves!

finished with sugar on top cropped.jpg

Batter Beauty

I am not being paid to say this, but I love my new mixer.* I haven’t had a hand mixer (that works) in at least ten years. I’ve had my hand, my wrist and a good whisk, yes. And I’ve had a powerful stand mixer, the kind you keep in the cabinet and lug out for big jobs. But I haven’t had that in-between, lightweight kind that’s as easy to take out from a drawer as a spoon is and that in no time at all whips up cake batter or heaven knows what else I will discover in the coming months.

For now, the cake batter has my attention. Chocolate cake particularly.

I do not consider myself artistic either on the being-an-artist side or on the recognizing-good-art-when-I-see-it side. The beauty/appeal of modern art, including pretty much everything in the Hirschorn Museum in Washington, D.C., touted “as a leading voice for contemporary art and culture,” completely eludes me. Nonetheless I stand ever in awe at sunrises and sunsets, smiles on the faces of children, majestic landscapes, creatures large and small, and colorful, delicate flowers. I think we humans have an intuitive sense of what is truly lovely, even if we each identify different examples, even if we can’t articulate very well exactly what’s amazing about what we are looking at. There’s something about shape, gleam, patterning, movement, authenticity and that very fine line between familiar and unique that catches our eyes.

The chocolate cake batter had me utterly entranced! And no, I was not under the influence of any mind-altering substance.

The mixer did it. The mixer has thin but strong wire beaters. They don’t look particularly powerful.

beaters (2).jpg

But oh, what they do to cake batter!

Understand, I repeat, that I have not had an electric hand mixer in a long time. I have been managing just fine with the baby and the beast – my whisk and my stand mixer. So I was a little skeptical. I beat the butter and sugar together. Okay, nice. “Fluffy,” as recipes like to say.

butter and sugar.jpg

I added two beautiful eggs. (Look at those eggs, huh?)

adding eggs (2).jpg

The butter-sugar-eggs combo developed a smoothness that started to look kinda pretty. But, hey, I’m just here to make cake, right?

butter sugar and eggs.jpg

My recipe calls for the rest of the dry ingredients to be added alternately with the buttermilk. This is the recipe by the way: Best-Ever-Chocolate-Cake-From-Scratch. It might have been on the back of the Hershey’s cocoa tin years ago, but I cannot be sure. The chocolate cake recipe that’s now on the back of the Hershey’s cocoa carton (no longer a tin) is different. (My note of praise in the upper right hand corner was from when I made copies of my favorite recipes for my children and put together cookbooks for them, but that is another story.)

recipe (2).jpg

Anyway, I got to the part where you add milk and then flour, then more milk and then more flour. That’s when it started getting interesting.

Do you see what I see? Do you see the swirls, the cake-batter-landscape of little hills and valleys and possibly river gorges cut through in an age gone by? The random spatters just above the land mass on all sides? Now watch. Depending on where the beaters are within the bowl and what angle you hold them, the batterscape changes.

This slideshow requires JavaScript.

For the record, I love chocolate. Vanilla ice cream doesn’t hold a candle to chocolate. Cake of any flavor but chocolate is trying, I know, and I give it credit for trying, but the competition is simply too great. Chocolate wins for me every time. This fact could perhaps contribute to my increased delight as I went from the batter above to its better (i.e. chocolate) version.

If you decide to try this recipe, please note that even though the recipe calls for you to get to the stage above and then mix up the cocoa and boiling water into the positively glistening paste that results, I suggest you do that at the start so as to let that mixture cool a bit.

chocolate.jpg

And if you don’t already have a mini-scraper like this, you might want to get one, even if it is not as cute as this. I find this size comes in very handy.

You add the chocolate to the beautiful swirly batter in the bowl. (Just imagine how excited I was at this point anticipating! If the pre-chocolate batter patterns moved me as they did…)

mixing chocolate in7.jpg

Here we go, folks! Let the marbling begin, even as you know that the two will become one glorious mixture.

This slideshow requires JavaScript.

I just loved the velvety smooth, different-every-second designs in my bowl…

batter design2.jpg

…the way the light shone here and there…

batter design3.jpg

…the kaleidoscopic variance.

batter design1.jpg

Call me crazy (and you may be right), but I had fun making this cake! Beauty is all around, isn’t it?

————————–

*My new mixer is a Kitchen Aid model KHM512MY in majestic yellow.