A Wooden Pie Crust

The other day I had an idea. It fits along the lines of what architects call the “design spiral” and what I see as the way ideas evolve. That is, you have an unfinished, unsettled or ill-defined part of the building project that needs to be figured out. In my experience, light bulbs — a.k.a. ideas — don’t turn on in one click but rather come on slowly, as if someone had control of the dimmer switch. One thought leads to another and in the end there’s a solution, a point of yes-that’s-right-(finally!). All contributing factors – budget, context, history, personality, goals – have been considered and satisfied. You like it, you approve it, you move forward.

Such was the case with the wooden pie crust.

To help explain the situation, here’s a side view of the cottage. See the blue triangle? The blue triangle became a space to fill. Not on the cottage though.

firepit_LI2mp.jpg

You see, when Bradley was building the cottage, he made the window frames (made the window frames, that’s cherry you see, made that door too, fyi) and then called the local glass company to come and measure for the glass to go in them. The guy measured for the trapezoids wrong (it’s simple geometry, I remember Brad saying to me) and the glass didn’t fit, so the glass company ate the mistake, remeasured, and produced correct sizes. They didn’t want the first, incorrect windows, so we kept them in storage. When the time came to build my porch, I wanted to borrow some architectural elements from the cottage and decided to use these leftover trapezoids. They will flank the as-yet-undelivered center window over the bench. You see the same blue triangles.

porch ceiling2mp_LI (2).jpg

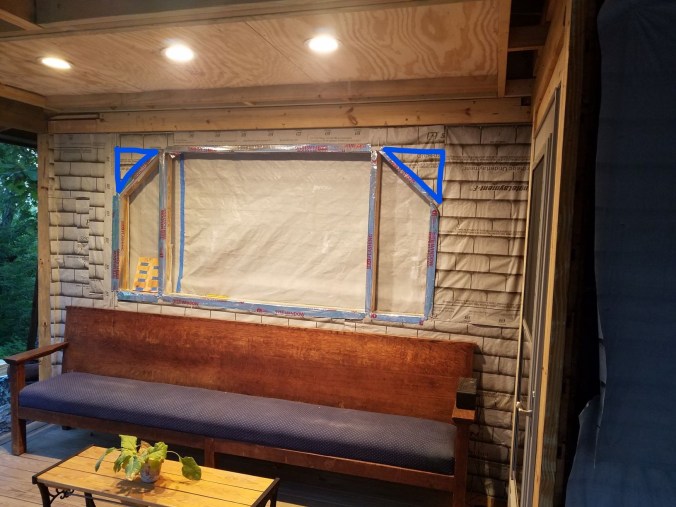
Since the line across the top of this set of windows is straight instead of steeply pitched like the cottage, the trim/molding around the windows either has to work around the angle of the trapezoid or stay straight. Angling the trim didn’t seem right, but if it stays straight, that would leave blank spaces (the blue triangles) that to me would look weird. What do you fill it with? Siding?

What to do in that space – that was the question.

Sandy suggested a decorative rosette. Here are some examples of rosettes one could consider. I didn’t want a flower or a circle or a tree or a fleur de lis or any of these, plus they are mostly made for square spaces, not triangular, but the ones that look interwoven gave me an idea.

This slideshow requires JavaScript.

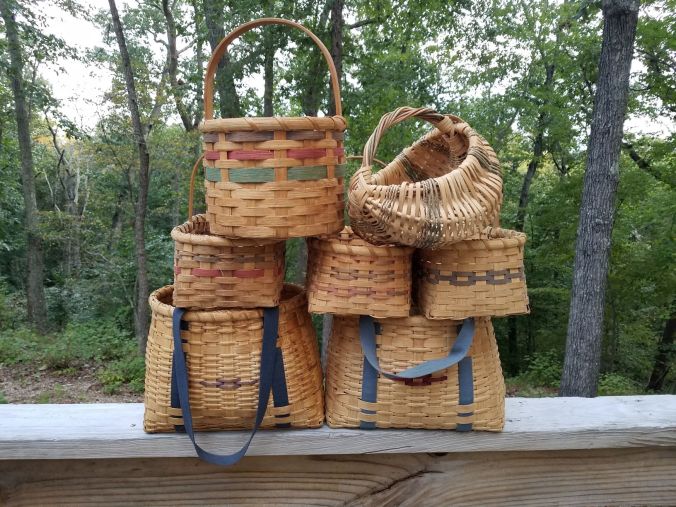
Years ago I knew a woman who had her own basket-making studio. As a homeschooling activity, several times, my children made baskets of their own under her instruction. These are the ones they didn’t claim (when they left home) and I still use frequently. There is nothing like a good basket.

baskets2mp.jpg

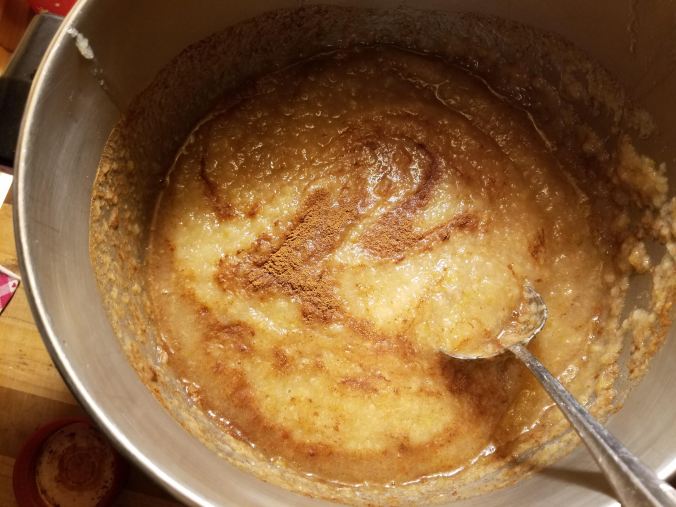
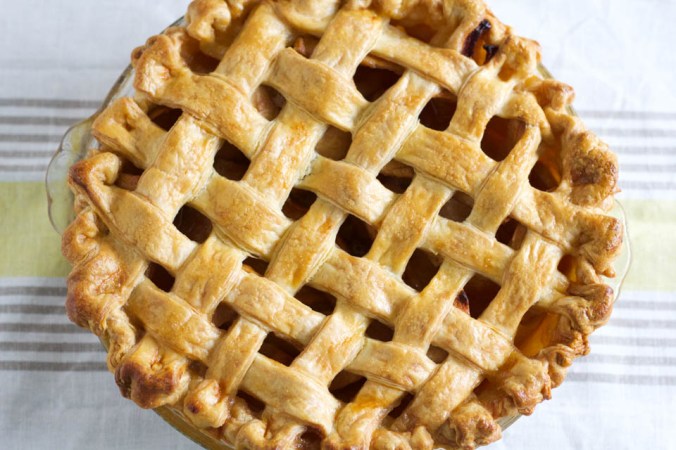
Another factor that somehow came into play here is that I love to bake. When you love to bake, it is not hard to think of pie, especially in the fall when the apples are coming in. I have always loved the look of a lattice top on a pie. Yesterday I bought 40 pounds of apples at my favorite orchard, Albemarle Ciderworks, and soon will be enjoying a piece myself (to say nothing of lots of applesauce!). This image of a lattice-topped pie from notjustbaked.com shows you what I mean. King Arthur Flour also has a marvelous video that shows how a lattice crust is made.

lattice-apple-pie.jpg

My idea to fill the blank spaces at the tops of the trapezoid windows evolved from “something has to go in that space” to a solution that feels personal. It combines fond reflections of the baskets my children made years ago and my love of a good lattice-top pie, and it satisfies that part of me that wants something a little less pre-fab, a little more unique, not too expensive and not overly challenging.

I thought of getting ash strips, the kind you would get for basket-making, and weaving them like pie dough. Then I remembered the thin ash veneer you can get in one-inch width, and decided to play with that. It worked!

wooden pie crust2mp.jpg

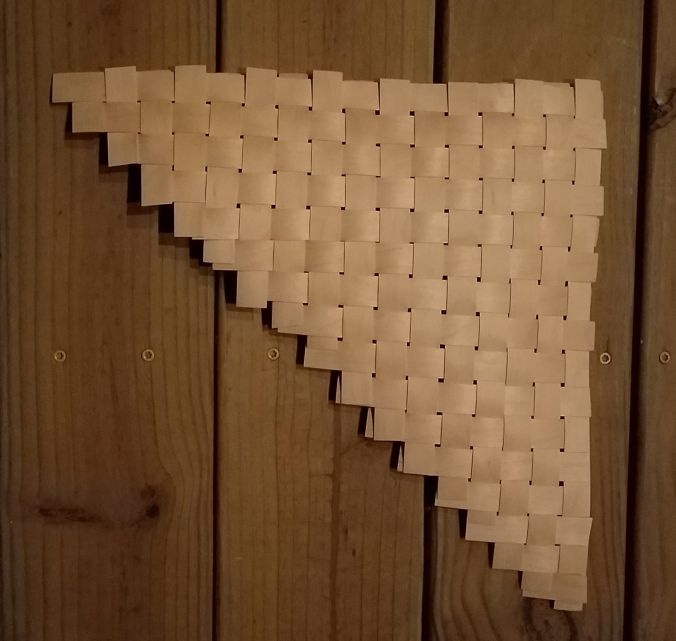
This stuff even has a kind of glue on the backing that responds to heat, so when the time comes to adhere the triangular webs to the luan (thin) plywood pieces that Sandy cut into the same size, I will try using an iron, and will do it on a test-strip first of course! This will also serve to flatten it.

And then we will find a way – I don’t know how yet – to affix this to the wall in the empty space and trim it out with the molding. I think it can go both inside and outside as a not-too-obtrusive bit of interest. In the living room I will paint it white to match the inside moldings and on the porch use the same stain as the trimwork out there.

A year ago we started this project. I love that there’s pie as we head into the home stretch 😊!

A is for Applesauce

For as long as I can remember, I have made applesauce come fall. It’s a signal of the season change, when my best descriptor of the air is “crisp” and my thoughts turn – without intention – to hunkering down and getting ready for the colder, shorter days of winter. It’s fundamental to our primal instincts to get ready for scarcity of food, even if we don’t have to worry about that at all. Applesauce is one of those pure foods that’s good warm, cold or icy, all by itself or next to a slice of pork roast or a potato pancake.

It’s simple. You wash the apples, cut them up, put them in a pot with a little water, let it cook down, press it through a strainer, add some cinnamon if you want, and enjoy! I’ll take you through it step by step.

Amazing apples make amazing applesauce, so start with apples as fresh and crisp as possible and as local as your location allows. I am fortunate to live 20 minutes from a well-established and super impressive family farm that specializes in heirloom apples. https://www.albemarleciderworks.com/

sign.jpg

One day last week I happened to be going right by there, so I stopped in for 40 pounds, my usual portion when applesauce is the goal. (Forty pounds fills three canvas shopping bags a bit more than half full each, in case you wondered.) Normally Albemarle CiderWorks has five or six long folding tables set up along the outside wall of the barn with a box of each kind of apple, one after the next, in a long row on the tables. (There’s a good photo on their web site showing this.) They have small paring knives and paper plates and descriptions of each apple set out in front of the boxes, so that you can sample them and decide what you like best.

But last Thursday it was raining and all the apples were in cold storage. I was escorted into that living-room-sized refrigerator and chose fast! Cold storage is cold!

Different apples are picked at different times, and different apples are best for different purposes. Applesauce naturally comes out best when you use apples that are best for cooking. For me that means they are very firm and a bit tart, which is as technically descriptive as I can get. Last year I got one called Black Twig that was extraordinary, but it comes late in the season and was not available yet. Virginia Gold and Liberty looked good to me in the ten, very cold seconds inside the fridge that I allowed myself to contemplate this decision, and the woman helping me confirmed that they would make great applesauce. Pack ‘em up! Done! Homeward I drove.

Yesterday, following too much rain this past week, the ground was too wet for the final grading in front of the house, so we thought maybe it would be a good time to get the oak clapboards on the coop. That job has been sitting all summer on the back burner while we waited for the wood to be milled and got involved with other things. We had barely started measuring and cutting boards when raindrops came again, so we turned our attention to the basement, more specifically to making order in the basement. A lot of stuff got moved to clear the space in front of the interior wall of the foundation that needs repair, and that stuff had been put here, there and everywhere. It took a couple hours, but all is decently in place now. A bunch of stuff is in the trash.

Then it wasn’t raining anymore, and the coop siding beckoned still. But before heading out, I decided to get the applesauce going. Look how beautiful they are in my sink.

apples in sink.jpg

I rinsed them off and stared at them a bit, admiring their gloss, their unique colorings – every Liberty with slightly different transitions from reddish to greenish, every Virginia Gold with different splotches and spots of brown. I have to admire them before I cut them up. It seems the respectful thing to do.

But once you start cutting, you just cut. The little ones you can quarter, the big ones in sixths or whatever is quickest. Seeds and skins stay; stems go in the compost or trash.

cut up.jpg

I can’t be overly specific regarding quantities here because it’s entirely up to you how much applesauce you want to make. Take out a big pot (I used my five-gallon pot) and put about half an inch of water in the bottom of it. Put your cut-up apples in the pot until you can’t fit any more. Mine looked like this.

start.jpg

Cover the pot, turn on medium and walk away. Go read a book or put siding on the coop. With the lid on top and the water in the bottom, those apples will just steam and get soft. After about an hour I took a break from the siding and checked on them; mine were doing what they are supposed to do: reducing in volume, steaming away, looking like this.

after one hour.jpg

Yours might take a little less time if it’s a lesser quantity. (What makes me think that not everyone is going to fill a five-gallon pot? You can make a smaller amount, but after you taste it, you’ll wish you made more!) The apples need to cook down slowly, and all they need is time and heat. Give it a stir at this point if you want, but it’s not the end of the world if you don’t.

After about two hours it reaches the point of mushiness where you can easily stir it with a wooden spoon and make mash by doing so. By this time the aroma of apples fills your home and you wonder why more people don’t cook.

after two hours.jpg

See the mash around my spoon? With a few more stirs, it all looks like that and you can spoon it into the strainer that you have set up in a bowl.

mash in strainer.jpg

Except for the skins and seeds, it’s applesauce now. Why not just peel and core them before cooking them? You can, but that process is tedious and time-consuming, and you lose more of the flesh of the apple that way. I do not have that kind of patience, much as my chickens would love the extra apple they’d get. And these apples are precious to me – I want as much of them as possible going into my applesauce.

Now all you have to do is press the applemash through the holes of the strainer with the back of a spoon. A Foley food mill works well for this too, if you have one of the older models. I found the newer ones problematic and more trouble than they are worth. My sister Lynn loves her Foley food mill; if I still had my old one, I’d probably love it too. But we get used to things one way or another. See what works for you.

pressing against side.jpg

Note that the holes of my strainer are not super tiny. They are big enough for the sauce to go through pretty easily, but not so big as to allow the seeds through. Every now and then scrape the underside of the strainer.

underside of strainer.jpg

I discovered quickly that my bowl was going to fill up too fast, so I switched to using my Dutch oven as the bowl underneath. Then when the level of the applesauce reached the bottom of the strainer, I transferred the applesauce to the bowl.

Keep pressing applemash against the sides of the strainer until all you have left is skins and seeds. It will look like this.

seeds and skins.jpg

Scrape out the seeds and skins from the strainer into a separate bowl (this is great for your compost or your chickens!) and start again.

With the quantity I made, I added cinnamon each time the bowl became full (instead of waiting till it was all strained through and then adding cinnamon). Now that I think of it, I suppose you could put cinnamon sticks in the pot with the cooking apples, but oh well, maybe next time! I can’t tell you exactly how much cinnamon to use. It’s like salt and pepper: Add what seems right to you. I used about two teaspoons per three quarts of strained applesauce.

I love the swirl of the cinnamon getting stirred in.

stirring in cinnamon.jpg

You can put your applesauce in a container and put it in the fridge to eat soon, or you can put it in mason jars and can it in a hot water bath, or you can freeze it. I think freezing is best. It’s easy and allows for icy applesauce at some point down the road.

Quart-size ziplock bags work great. If one person holds the bag open and another person spoons it in, that’s ideal. If you are by yourself, try putting the applesauce in a large measuring cup with a pour-spout or a small bowl with the same, and holding the bag with one hand and pouring with the other. A wide-mouth funnel can be good too. You can also freeze in jars as long as you allow a good inch or so of air space for expansion, otherwise the glass will break. (And you don’t want that!)

I had filled my five-gallon pot to overflowing with cut-up apples and ended up with about ten quarts of applesauce and three cups of seeds and skins which my chickens enjoyed tremendously. Always keep a little out for enjoying fresh.

finished.jpg

Oh, and if you think your applesauce is too watery, just cook it down a little more after you’ve removed the seeds and skins. That’s how you get apple butter – it’s just way-cooked-down applesauce. It might take another hour or so to cook down. Turn off the heat when it’s as thick as you like. In the meantime your house is blessed with apple aroma again! Some people add sugar too, at the end. That’s your call.

For those who are wondering how you get icy applesauce, just thaw one of your frozen bags or jars to the point where you can break the applesauce apart with a fork. Stir until desired smoothness. Oh yum!

And the coop — I love the siding! Claudia calls it a chicken castle! More on that soon 🙂

5.jpg