Lynn and Billy are Pierogi Pros. There is no thinking required following the question: How about if we make pierogies when we come to your house? Yes!
The first question is How many cans of sauerkraut? Lynn routinely uses 15 or 16 for her own party (and made 974 pierogies last time!), but that seems excessive for me and Mom. In February we used five cans. For the December party we settled on three (and maybe we’ll be sorry, but we’ll adjust next time if we are). Imagine the difference in the number of little footballs you have to make ahead of time and the number of pierogies you line up on the pan. Here’s Mom doing an excellent job! Look at those perfect rows!

Making pierogies is not for the faint-hearted or weak-willed. It’s complex, time-consuming and has various nuances of technique that Lynn and Billy have perfected over the years. Nonetheless, as they say, if we can do it, so can you! What follows is a brief pictorial overview of the process. You are invited to ask questions of me or Lynn if something doesn’t make sense.
Day One:
Make the potato-cheese filling and the little cabbage rolls. You do this the day before because 1. It spreads out the work and 2. It allows time for the fillings to cool, making them much easier to work with.
Filling for Potato-Cheese Pierogi
Sauté 2 large onions in 2 sticks (1 cup) butter until just golden. Add 3-4 cups mashed potatoes, 2 (8-ounce) packages softened cream cheese and salt and pepper to taste. An electric mixer is great for this. We used the stand mixer. Let mixture cool, put in a bowl, cover and refrigerate.
Filling for Cabbage (Sauerkraut) Pierogi
Melt 2 sticks (1 cup) butter in large pan. Add 2 large (27-ounce) cans sauerkraut that has been rinsed and drained, and salt & pepper to taste. Cook slowly (low heat) for about 45 minutes until sauerkraut is soft. Let cool, put in a bowl, cover and refrigerate.
Day Two:
First, make little cabbage footballs using your hands like this. Lynn calls them rolls or logs, but their ends do tend to taper down like footballs, just saying…
These little footballs will fit in the form like this.

But let us not get too far ahead.
Once your cabbage footballs are formed, clear your workspace and gather your tools. You never saw my butcherblock so clean! This is, in fact, a good opportunity to get the dust and you-know out of those corners and crevices, a bit of pre-production deep-cleaning, one might say…
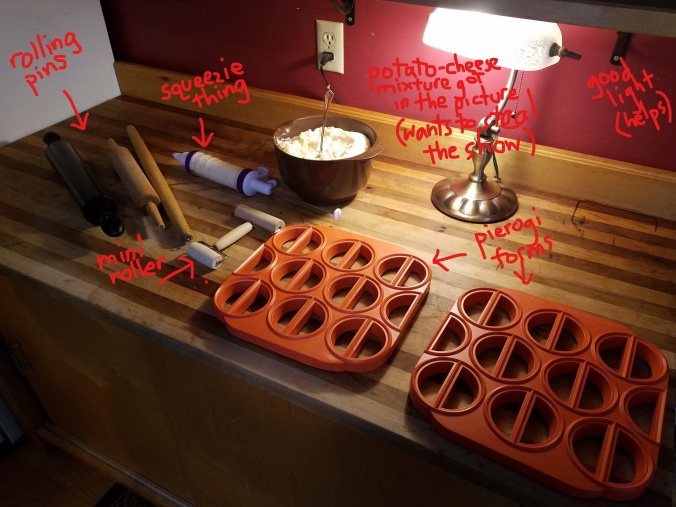
You see three rolling pins. Billy’s is the big, black, marble, heavy, hefty one. You will see why. Mine are the two rather average wooden ones. I didn’t know which one of those Samuel would prefer, and he did not show up until the last minute, being involved with his coding during every other possible minute, so I brought them both out.
The potato-cheese mixture in the bowl on the butcherblock is clearly an ingredient and not a tool, but since it didn’t get its own set of photos while being made (and secretly thinks it’s better than the cabbage footballs), it snuck into the photo here to make sure, at the very least, that it is not forgotten.
Now you are ready to call the troops in and get going with the full operation. These are the ingredients for the dough, all set up in their own space. We are nothing if not organized! Okay, Lynn is nothing if not organized!

The recipe says:
Dough
Combine 4 cups flour, 2 eggs, 4 tablespoons melted butter, 1 ½ teaspoons salt, ½ cup water. ½ cup milk. and roll out thin. Transfer to pierogi forms. Fill with filling. Top with another thin layer of dough. Press with roller. Trim away excess dough.
I mean, how simple is that?
Here it is again, starting just before “roll out thin…” This is enough mixing in the bowl. Billy did the rest with his hands.

And then he divided that amount of dough into four pieces.

Then “roll out thin.” When we say thin, we mean thin. You go from this…

…to this…
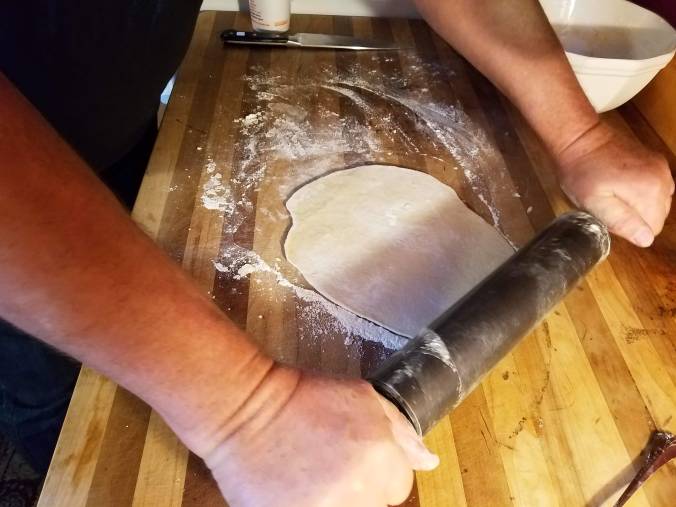
…to thin enough to fit on the 14×14” form.* Move it gently and carefully.

Billy is the Official Dough Roller. This task requires strength, endurance and no small amount of organization (is this the dough you rolled out twice already? – all looks the same to me!). This guy knows what he’s doing. His smile really says Trust me, I rolled out that dough twice already. You don’t argue.

For the record, Samuel followed Billy’s dough-rolling lead (which dough was that again?) and will someday be glad he participated in this craziness, even if right now he would rather be coding.

I squeezed out potato-cheese filling and placed little cabbage footballs in the form and pressed edges together and in general tried to be useful when not temporarily holding up the works with my (frequent) “hold, hold, hold!” while I stopped to take pictures, a habit I expect was not altogether appreciated at the time, but here we are with (yes, folks!) pictures!
Once you have placed the first layer of dough on the form, you milk the edges (with milk) to help the top layer of dough stick better…
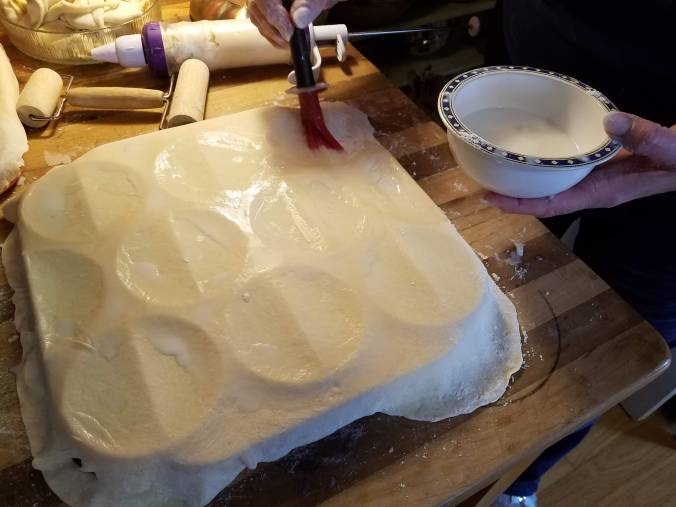
…and put the fillings in. Lynn, Master Organizer (aside from deferring to Billy on the question of Has this dough been rolled out twice already?), presides over the squeezing out of the potato-cheese filling.
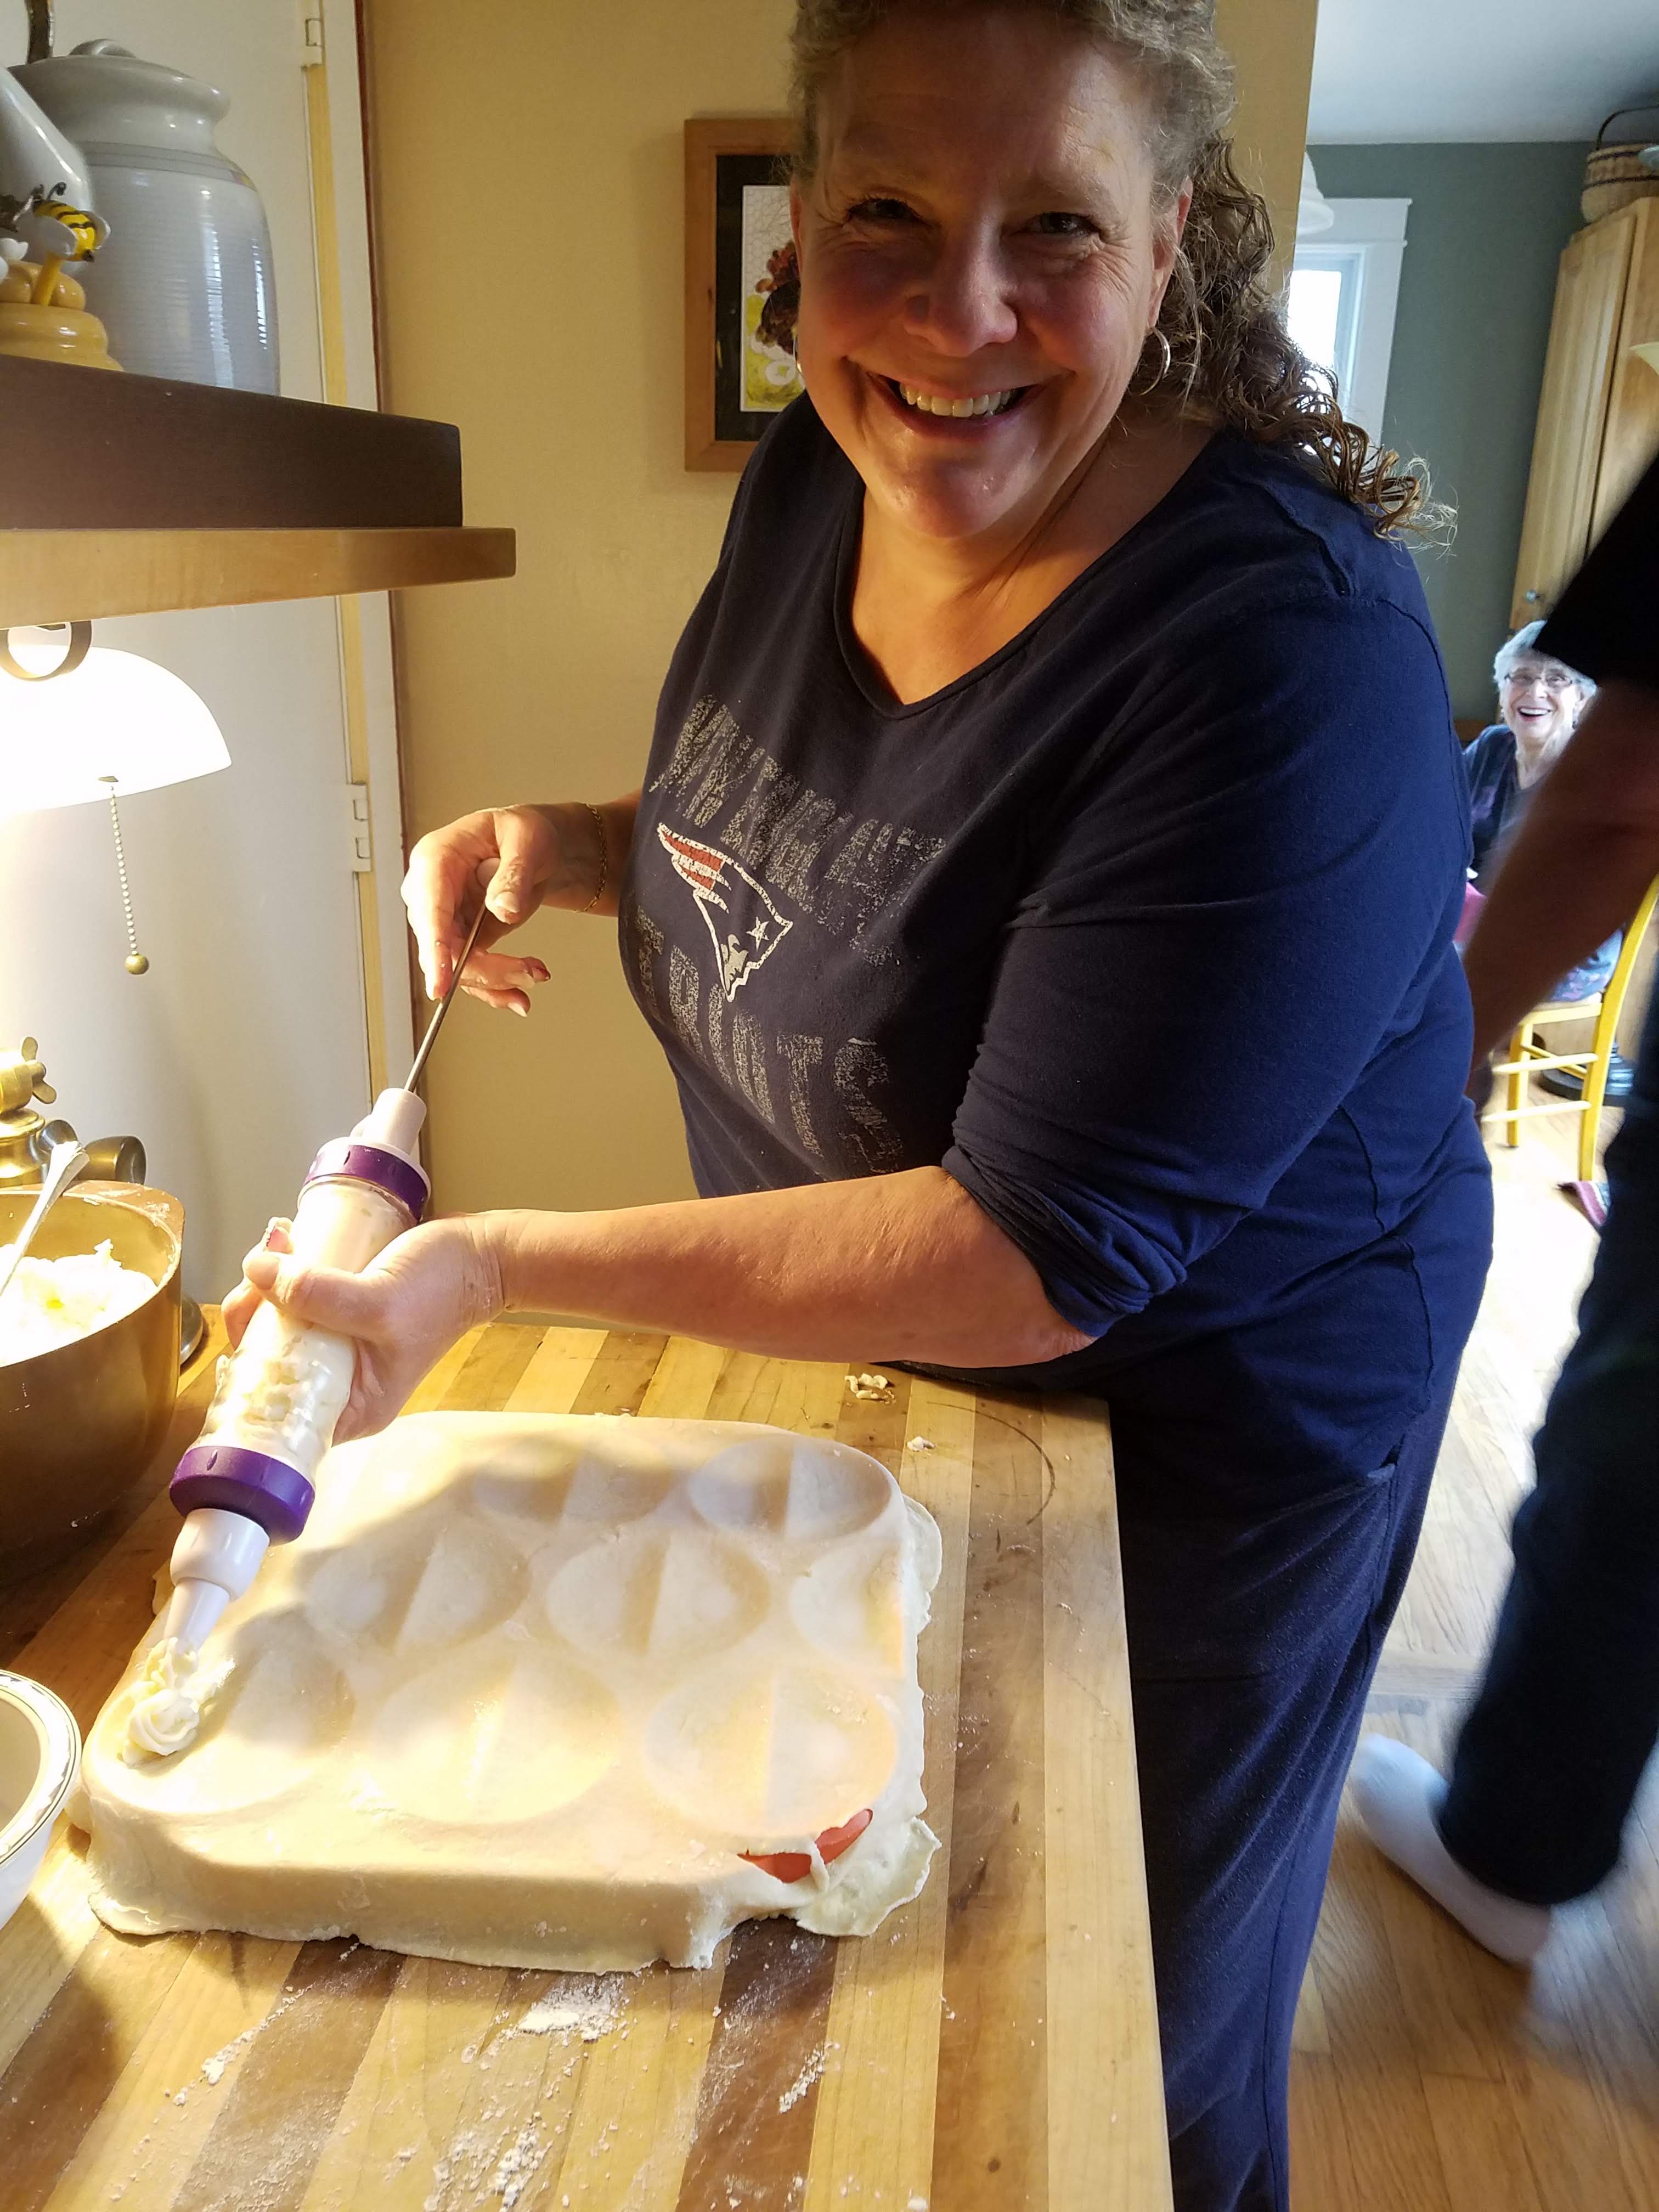
You see in the next photo that the portions are not exact and the shape of the dollop is not the same in every one. They are not perfect. We are not perfect. This is not an automated production line in a pierogi factory. We are not automated machines making every dollop the same. That squeezie thing has a mind of its own sometimes, and getting it to break off the desired quantity is a practice-makes-respectable kind of thing. This is my home and we are perfectly at ease with (at least certain kinds of) imperfections. Imperfections make it real and fun and challenging and wonderful and everything a store-bought pierogi can’t be.

Once the form is filled, you put the second layer of dough on top

and take the mini-roller and press against the semi-circular edges of the form. You could manage with one of the regular rolling pins or even a straight-sided glass jar.

Lynn likes the wider side of the roller and I like the narrower side. Either way, the job gets done and the edges are pressed together enough to hold.

You have to press hard enough that the pierogies practically break away from the form on their own (see the orange of the form showing through?).

And then you can remove the excess dough, which gets re-rolled once and once only, thus the previous “which dough was that again?” to keep track of the dough’s cycle.

You remove the excess dough carefully, then take the whole thing over to Mom and her waiting tray, and flip them out. (Not the standard usage for the phrase “flipping out,” I grant, but the right phrase nonetheless.)

See how wonderful they look! Like Mary Poppins: Practically perfect in every way!

We kept track of numbers this time by writing with a sharpie on a corner of the waxed paper that divided the layers (three layers max). C=Cabbage P=Potato (But you knew that.)

Layering the pierogies with waxed paper and using a little cornmeal on the surface helps keep them from sticking to one another. You freeze them right on the pans like this. When they are frozen solid, you put them in bags and label them.
We of course couldn’t help it and had pierogies for lunch. How does one say YUM most emphatically!!?? And between my freezer and Mom’s we have the remainder. To give you an idea of quantity, we made 67 cabbage pierogies using 3 cans of sauerkraut and 166 potato-cheese pierogies using 4 pounds of potatoes. That’s a far cry from Lynn and Billy’s 974 total, but Mom and I and everyone who eats at our tables over the next half year or so will enjoy every last bite of these. Plus, we know it won’t be long until Lynn plans a trip and says How about if we make pierogies when we come to your house? Yes!
*In case you are interested in this form, here is the info on it.


This is not a good article to read while choosing what to cook! Well, it won’t be pierogies. But my memories of making them with Lynn and Billy at their home make me want to make and EAT them. Just being left with the memories makes my mouth water. Hope to be part of the making process one of these days again and… EAT and enjoy them with all of you!
LikeLike
Just for information: I made Kraut-Spaetzle. Uses kind of the same ingredients as pierogies: flour, eggs, salt, water + I used a little milk like my sister in law – the world’s best cook (quoting my children and I would second this anytime) – does. I had leftover Sauerkraut in the fridge. Quick meal.
LikeLike
If you can’t have pierogies, have Kraut-Spaetzle! I often make spaetzle (simple homemade noodles) because they are fast and easy and use eggs! This not only adds protein to our meal, it… uses eggs! and I have lot of them!
LikeLike